If the product page indicates an Estimated Restock Date, the item/fabric should be available for new orders around the estimated time indicated.
Click ‘Be Notified When Back In Stock’ to receive an email notification as soon as the item/fabric is available again for new orders.
Discontinued Item/Fabric
If the product page indicates Sold Out / Discontinued, the item or fabric inventory has completely sold out and will not be reordered in the foreseeable future.
Not all changes require a full remake. If the adjustments to your jacket or pants sizes are minor, it may make more sense to have them altered locally by a tailor, which we’re happy to reimburse with store credit.
Requesting Tailoring Credit/Reimbursement
Once you’ve had the alterations done, email a photo of the receipt along with the Proper Cloth order number to contact@propercloth.com. We’ll be happy to reimburse you via store credit.
The amount that will be reimbursed depends on the type of garment:
Up to $125 for a suit (jacket and pant pair)
Up to $75 for a jacket
Up to $50 for dress pants
Up to $30 for casual pants
Maximum tailoring credit per customer is $300
Requests for tailoring reimbursement must be initiated within 60 days of when the order was placed.
Below, you’ll find Proper Cloth’s guidelines for how certain areas of our jackets and pants can typically be adjusted. Depending on the tailor and the overall size of your garment, these ranges may vary.
If the garment dimension is not listed below, we do not recommend having a local tailor adjust it and would instead suggest a remake.
Jackets
Dimension
Shortened/Decreased
Lengthened/Increased
Chest Width
– 0.75”
+ 0.5”
Midsection Width
– 1.25”
+ 1.0”
Hip Width
– 0.75”
+ 0.25”
Sleeve Length
– 0.5”
+ 0.5”
Sleeve Bicep Width
– 0.75”
+ 0.25”
Sleeve Opening Width
– 0.75”
+ 0.25”
Neck Posture
Neck Back 0.5”
N/A
Pants
Dimension
Shortened/Decreased
Lengthened/Increased
Waist Width
– 1.5”
+ 1.0”
Hip Width
– 1.0”
+ 0.5”
Thigh Width
– 1.5”
+ 0.5”
Knee Width
– 1.5”
+ 0.5”
Leg Opening Width
– 1.5”
+ 0.5”
Inseam Length
– 4.0”
+ 1.0”
Finding a Tailor and Completing Alterations
Having your garments altered locally is up to you. We don’t have specific tailors to recommend. If you don’t have a tailor that you trust, try searching online for one in your area with a good reputation. When you meet with them, you can usually tell them exactly what you want to change, or you can put the garments on with them and together determine what alterations make sense.
Important: Note the Size Changes
We strongly encourage you to take note of what changes your tailor makes to the garments so that you can update your saved sizes for future orders. Our support team is always happy to help update your profile for you.
A Potentially Faster Alternative
In some cases, having your garments altered locally can be faster than requesting a full remake. Check here for current delivery times for garment remakes (remakes have the same delivery times as new orders).
Tailored clothing items include classic office staples, relaxed dress pieces, and formal attire. All of these garments should be cared for appropriately to ensure they stand the test of time. If you’re wondering how to care for a suit, simple instructions are on the garment tag. But the article below will give you greater detail on caring for tailored clothing.
Professional Cleaning Only
Dry cleaning is the recommended cleaning method for tailored clothing, though it should be done as infrequently as possible—after several wears or once per season, not after each wear. Garments cleaned less frequently will last longer than garments cleaned more frequently.
It is important not to clean your tailored clothing items in a washing machine or dryer. This can irreparably misshape or damage them.
Spot Care at Home
Caring for Wool Fabrics
Spot cleaning with wool detergent and a wet cloth is an effective way to care for a suit and great for removing small stains. It is best to blot the stained area. Avoid rubbing as this can force the stain deeper into the fabric fibers.
A wool/fabric brush can be used periodically. This will prolong the life of the garment by removing loose particles that could break down the wool.
Caring for Cotton & Linen Fabrics
Spot-treat stains promptly, blotting the stained area with detergent and a wet cloth.
Removing Wrinkles
Wool is naturally wrinkle–resistant and rebounds well from wrinkles when hung between wears.Cottonsand linens are more naturally prone to creasing and do not rebound as easily as wool fabrics do.
In general, steaming is a great way to care for a suit. Steaming is recommended to remove wrinkles from your tailored clothing garments. It’s also a great way to freshen and disinfect your clothing. The high heat kills bacteria, while the moisture helps to relax the fabric’s fibers and release dirt.
Ironing is also acceptable, though it should be done on a low heat setting to prevent potential damage. Wool should be ironed on a lower heat setting than should be used for cotton or linen garments.
How Often to Clean
When it comes to caring for tailored clothing, less is more: these garments require less frequent cleaning than your dress shirts or casual pants. Trousers should be cleaned more frequently than jackets.
Jackets and trousers should be cleaned as needed as they display signs of odor and wear. Cleaning your garments will help to remove sweat and bacteria that may build up over multiple uses.
The best way to determine when it is time to send your garments to the cleaners is when you notice that airing out and spot cleaning aren’t removing the odor and dirt successfully.
Frequency of Wear
Pilling refers to the small balls of fiber that can form on almost any fabric. It’s mainly caused by rubbing and friction that occurs during wear or wash. The best way to prevent pilling is by wearing your garments less frequently, avoiding backpacks and bags that cause repeated friction in the same area, and not rubbing stains when spot cleaning. Cleaning your clothes properly will also help to prevent excessive pilling.
Despite these precautions, you may still experience some pilling over time. The most effective way to remove pills is by using a fabric comb or electric pill remover that gently shaves the pills off the fabric surface.
Fabric abrasion may also occur over time. Avoiding friction, refraining from frequent wear, and practicing good cleaning methods will help to prolong the fabric’s strength and reduce surface deterioration.
Even when you care for a suit, tears can occur in areas of a garment that undergo high stress or tension. If they occur at a seam, you can bring your garment to your local tailor and they should be able to mend it easily.
Esquire had some good advice on how to care for a suit, but if you’re still left with questions, the best thing you can do is reach out to our customer service.
If you’re deciding whether or not to alter a jacket or a pair of pants, it’s good to recognize limitations; your local tailor is a great option for small alterations, but trying to do too much lead to a garment coming out looking off. Overall, a garment should fit so the fabric creates a silhouette that highlights and flatters the wearer’s physique with clean, sharp lines. Below is a guide to the amount of tailoring we recommend for each dimension of our garments, up to which the structure and proportions of each garment will not be noticeably or negatively affected.
Altering a Jacket
Sleeve Width
The sleeve width is one of the easiest dimensions to alter.We recommend your sleeves have a slim fit but still allow enough room for mobility, however it’s normal to have less range of motion when wearing a jacket than you do without one. The sleeve width of Proper Cloth jackets can be taken out(widened) by 0.25”(0.5” in total) at the most. It can be taken in(tightened)by 0.5”(1” in circumference). Bear in mind that 0.25” goes a long way with this dimension.
Sleeve Length
Generally speaking, your jacket sleeve length should be 0.25”-0.5” shorter than your dress shirt sleeve(which should reach just beyond the wrist bone). The end of your jacket sleeve should stopat the wrist bone. The sleeves of our jackets can be lengthened or shortened by 0.5”. Note that the buttons on our jacket sleeves are functional, and significant shortening in particular may interfere with the buttons and button holes.
Chest Width
A good fit in the chest of a tailored jacket is important for both comfort and appearance. If it’s too tight, the lapels will bend outward and create a gap between the jacket and the wearer’s chest—not a great look. The Chest Width can be increased by about 0.4”, for a total of 0.8” in added circumference in the chest of the jacket, and reduced by up to 1”(a 2” total reduction in circumference) without affecting the structure or proportions of the jacket noticeably.
Midsection Width
The Midsection Width should drape cleanly across the abdomen and hips, with a slight taper down from the chest. If theMidsection Width is too tight, tension lines will form and radiate outward from the buttons as well as across the lower back. If you decide to alter a jacket in this area, our garments can be taken out by 0.4”, for a total of 0.8” in added circumference, and can be taken in by 1”(2” in total circumference).
Center Back Length
The Center Back Length cannot be adjusted by a tailor, as there is not enough hem material for the jacket to be lengthened properly. In addition, shortening the jacket length can throw off the jacket’s overall balance by bringing the pockets and buttons too close to the bottom of the jacket.
As a general rule of thumb, theCenter Back Length should reach the base of the seat in the rear and the base of the fly in the front, however your personal preference and style should also be a consideration. Those with a longer torso may opt for a shorter jacket for a fit that better balances the trousers. Those who prefer a more modern style may want a shorter jacket as well, as a longer length can give the impression of a more traditional, classic fit.
Shoulder Width
We don’t generally recommend having a tailor adjust the Shoulder Width of a tailored jacket. It’s a complex and expensive alteration that could cost well beyond Proper Cloth’s alteration reimbursement allowance. If this dimension requires adjustment, we recommend choosing a different base jacket size or requesting a remake.
The fit of the shoulders can make or break the overall silhouette of your jacket. TheShoulder Width should fall just past the ends of your shoulders. If it’s too short, you’ll notice a bump at the top of the upper sleeve. If it’s too wide, a dent will appear at the top of the upper sleeve.
Deciding Whether or not to Alter a Jacket
We offer a perfect fit guarantee because we know we can get it right. You can always request a remake, but before you do that or head to the tailor, get in touch with customer service for a second pair of eyes.
Alter Dress Pants
While it can be difficult to alter a jacket, making changes to trousers is a bit easier.
Waist Width
Adjusting theWaist Width can make a huge difference in the overall comfort of your suit trousers. The waist of your trousers should sit on or just above your hip bones and be tight enough to sit there without a belt and loose enough to allow 2-4 fingers to fit easily inside the waistband.The Waist Width ofProper Cloth trousers can be taken out by 0.75”(1.5” in total circumference). It can be taken in by 1”(2” in total circumference). Any changes to this dimension will require some changes to the seat(Hip Width) of the pants as well.
Hip Width
The Hip Width is also known as the seat. It can beincreased a bit, just 0.4″ in width (0.8″ in total circumference), but a remake is likely required for serious adjustments. You can, however, reduce the Hip Width significantly more–up to 1”(2” in total circumference). Excess fabric can be taken from the back rise seam in the center of the rear. The Hip Width can also be taken in from the side seams near the pockets, which can be helpful if adjustments to the thigh width are also required. Your trousers should drape cleanly over the hips without interruption between the waist and the thigh. Tension lines around the fly or the pockets popping open are indicators that the Hip Width is too tight and may require that you choose a new base size. The Waist Width will also likely need adjusting if the Hip Width is changing, so make sure to check the fit of that dimension as well.
Taper – Thigh Width, Leg Opening Width & Knee Width
Your personal style and body type will influence the taper of your pant legs, and therefore the measurements that govern it—Thigh Width, Leg Opening Width, and Knee Width. Theseare some of the easier dimensions to alter. Keep in mind that your pants should be comfortable when you’restanding, sitting, and walking. If the fabric of the lower pant leg catches on your calves when you’re seated and does not return to full length when you stand, the Knee Width and Leg Opening Width are likely both too tight.The Thigh Width, Leg Opening Width, and Knee Width can each be taken out by 0.25”(0.5” in circumference) and taken in by 1”(2” in circumference).
Inseam
Appropriate trouser length, or the Inseam, depends on the wearer’s preference. Typically, adjusting from a full break to half break, or half break to no break, the Inseam should be shortened by about 0.5”.Our trousers can be lengthened by up to 1” and shortened by up to 4”. Learn more about Pant Break here.
Back Rise & Front Rise
These dimensions cannot be adjusted by a tailor as they affect too much of the trouser’s basic structure. Tightness or discomfort in the seat or between the legs indicates the either the Back or Front Rise(or both) are too short. For a more traditional fit, you should opt for a higher(longer)rise so that the waistband sits above the hip bones. A more modern fit requires a lower(shorter)rise that allows the waistband to sit just below the hip bones. We recommend a fit somewhere in the middle, such that the waistband sits right at the hip bones.
Final Thoughts on Altering Garments
The decision to alter a jacket is a big one. For some additional advice, check out this post from the Gentleman’s Gazette. If you’re feeling stuck, the best thing to do is to schedule a virtual appointment to discuss your garments.
At Proper Cloth, we offer a wide range of shirt styles, and depending on the type of fabric used for the shirt, the care instructions will be different. Washing your shirt according to the suggested care instructions will help ensure that the shirt lasts a long time and will look its best.
Furthermore, we adjust each shirt for shrinkage differently, with the goal of the shirt matching your ordered dimensions plus standard allowances after 1-2 washes. Washing your shirt according to the suggested care instructions helps ensure that it will fit you consistently with your other shirts (and the way you want).
Overall we have nine different sets of care instructions for each of these types of shirts: Dress Shirts, Casual Shirts, Casual Washed Shirts, Denim Shirts, Knit Shirts, Non-Iron Shirts, Performance Shirts, Merino Shirts, and Dry Clean Shirts.
Your shirt tag will say “Machine Wash Cold, Non-Chlorine Bleach, Hang Dry, Iron Low Heat”
Prepare the dress shirt by unbuttoning all of the buttons, including cuff and collar buttons. Remove any collar stays and put them in a safe place.
Pre-treat any stains by carefully working a little detergent into them or spot-cleaning with a stain remover pen.
Set up your washing machine: To minimize wear on a fine or lightweight dress shirt, use the Delicate cycle. If the shirt is made from a heavier fabric, or is particularly dirty, you may opt for the Normal cycle. Whites can use warm or hot water. Colored shirts should use cold water to reduce fading. Take care not to include other laundry items with bold colors that could bleed onto your shirts.
Use a high-quality detergent, that is appropriate for the color of the shirt. Do not use chlorine-based detergents or bleaches as these can discolor your shirts.
Wash the shirts in the washing machine and let the spin cycle wring most of the water out of them.
The shirts will be tightly crumpled in the washing machine so remove them promptly before wrinkles dry into the shirt.
Lightly shake the shirts to remove wrinkles and hang the shirts on a hanger so they can air dry. Button the top-button only on the shirt as it hangs. Standard wire hangers are fine, but avoid using tight clothespins as these can distort the shirt fabric or leave a mark on the shirt.
Next you’ll want to iron the shirts. You don’t need to wait for the shirts to be completely dry to begin this step, but they should be mostly dry.
Put each dress shirt on a hanger, reinsert collar stays if you choose to use them and button the top button of each shirt. Ensure the collar is in a good position, and the collar points are not rolling under the collar.
Store dress shirts hanging on shirt hangers with the top button buttoned.
Casual Shirt Care Instructions
Your shirt tag will say “Machine Wash Cold, Non-Chlorine Bleach, Hang Dry”
Prepare the casual shirt by unbuttoning all of the buttons, including cuff and collar buttons. Remove any collar stays and put them in a safe place.
Pre-treat any stains by carefully working a little detergent into them or spot-cleaning with a stain remover pen.
Set up your washing machine: To minimize wear on a fine or lightweight dress shirt, use the Delicate cycle. If the shirt is made from a heavier fabric or is particularly dirty, you may opt for the Normal cycle. Whites can use warm or hot water. Colored shirts should use cold water to reduce fading. Take care not to include other laundry items with bold colors that could bleed onto your shirts. Similarly, some casual shirts use natural dyes that can bleed onto your other items, so be sure to only wash casual shirts with like colors.
Use a high-quality detergent, that is appropriate for the color of the shirt. Do not use chlorine-based detergents or bleaches as these can discolor your shirts.
Wash the shirts in the washing machine, and let the spin cycle wring most of the water out of them. The shirts will be tightly crumpled in the washing machine so remove them promptly before wrinkles dry into the shirt.
Lightly shake them out to remove wrinkles and hang the shirts on a hanger so they can air dry. Standard wire hangers are fine, but avoid using tight clothespins as these can distort the shirt fabric or leave a mark on the shirt. Button the top button of the shirt as it hangs and fluff or bat the shirt to remove as many wrinkles or folds as possible.
Shape the damp collar into a nice shape, ensuring the collar points are not rolling under. Make sure the shirt tails are not rolling up. Make sure the inside of a French front is not twisted or folded back on the inside of the shirt. For a Camp collar, only button the third button down (or whichever button you will button when you wear the shirt), and fold the collar back smoothly.
After the shirt is dry it is ready to wear. You can touch-up iron or steam it if you want, but most small wrinkles will work themselves out after you put the shirt on.
Store casual shirts hanging on shirt hangers with the top button buttoned or lightly folded and stacked.
Casual Washed Shirt Care Instructions
Your shirt tag will say “Machine Wash Cold, Non-Chlorine Bleach, Machine Dry Low Heat”
Prepare the shirt by unbuttoning all of the buttons, including cuff and collar buttons. Remove any collar stays and put them in a safe place.
Pre-treat any stains by carefully working a little detergent into them or spot-cleaning with a stain remover pen.
Set up your washing machine: To minimize wear, use the Delicate cycle. If the shirt is made from a heavier fabric or is particularly dirty, you may opt for the Normal cycle. Whites can use warm or hot water. Colored shirts should use cold water to reduce fading. Take care not to include other laundry items with bold colors that could bleed onto your shirts, and only wash with like colors if the fabric uses natural or garment dyes.
Use a high-quality detergent, that is appropriate for the color of the shirt. Do not use chlorine-based detergents or bleaches as these can discolor your shirts.
Wash the shirts in the washing machine, and let the spin cycle wring most of the water out of them.
Dry the shirts in a machine dryer on a Low Heat setting.
Promptly remove the shirts from the dryer. Fluff and bat them to remove major wrinkles. Put the collar in a nice position and fold the shirts carefully.
Store casual washed shirts hanging on shirt hangers with the top button buttoned or lightly folded and stacked.
Denim Shirt Care Instructions
Your shirt tag will say “Machine Wash Cold with Like Colors Only, Machine Dry Low, Low Iron”
Prepare the denim shirt by unbuttoning all of the buttons, including cuff and collar buttons. Remove any collar stays and put them in a safe place.
Pre-treat any stains by carefully working a little detergent into them or spot-cleaning with a stain remover pen.
Set up your washing machine: Use the Delicate or Normal cycle and cold water. Denim fabric is dyed with indigo or other dyes that can bleed, so only wash denim shirts with like colors, and never with whites or light-colored garments.
Use a high-quality detergent, that is appropriate for the color of the shirt. Do not use chlorine-based detergents or bleaches as these can discolor your shirts.
Before washing, turn the shirts inside out to help reduce fading and protect the surface of the fabric.
Wash the shirts in the washing machine, and let the spin cycle wring most of the water out of them.
Dry the shirts in a machine dryer on a Low setting. Remove promptly to minimize wrinkling.
If necessary, touch up with a low-heat iron to smooth out wrinkles on the body or sharpen the collar.
Store denim shirts hanging on shirt hangers with the top button buttoned or lightly folded and stacked.
Knit Shirt Care Instructions
Your shirt tag will say “Machine Wash Cold, Non-Chlorine Bleach, Machine Dry Low, Do Not Iron”
Prepare the knit shirt by unbuttoning all of the buttons, including cuff and collar buttons. Remove any collar stays and put them in a safe place.
Pre-treat any stains by carefully working a little detergent into them or spot-cleaning with a stain remover pen.
Set up your washing machine: To minimize wear, use the delicate cycle. Whites and very light colors can use warm water. Darker-colored knit shirts that you don’t want to fade should use cold water. Take care not to include other laundry items with bold colors that could bleed onto your shirts.
Use a high-quality detergent, that is appropriate for the color of the shirt. Do not use chlorine-based detergents or bleaches as these can discolor some shirt fabrics.
Wash the knit shirts in the washing machine, and then let the spin cycle wring most of the water out of them.
Dry the knit shirts in a machine dryer on a Low setting.
Promptly remove the shirts from the dryer. Fluff and bat them to remove major wrinkles. Put the collar in a nice position and fold the shirts carefully.
Do not iron the knit shirt. Knit fabrics can be permanently distorted or develop a shine when subjected to heat from an iron.
Button the top button and leave the collar sticking up straight, or in a position where it can lay flat naturally.
Store knit shirts lightly folded and stacked. Avoid storing knit shirts on hangers as this will cause the sleeves and body of the shirts to elongate over time.
Non-Iron Shirt Care Instructions
Your shirt tag will say “Machine Wash Cold, Non-Chlorine Bleach, Machine Dry Low Heat, Low Iron”
Prepare the non-iron shirt by unbuttoning all of the buttons, including cuff and collar buttons. Remove any collar stays and put them in a safe place.
Pre-treat any stains by carefully working a little detergent into them or spot-cleaning with a stain remover pen.
Set up your washing machine: To minimize wear on a lightweight non-iron shirt, use the Delicate cycle. If the shirt is made from a heavier fabric, or is particularly dirty, you may opt for the Normal cycle. Whites can use warm or hot water. Colored shirts should use cold water to reduce fading. Take care not to include other laundry items with bold colors that could bleed onto your shirts.
Use a high-quality detergent, that is appropriate for the color of the shirt. Do not use chlorine-based detergents or bleaches as these can discolor your shirts.
Wash the non-iron shirts in the washing machine and let the spin cycle wring most of the water out of them. Remove promptly.
Dry the non-iron shirts in a machine dryer on the Low setting. *Note: Non-Iron shirts are designed to be dried in a machine dryer, and it is this process that helps remove the wrinkles from the shirt.
Promptly remove the shirts from the dryer. Shake the shirts a bit to help the fabrics return to their natural smooth shape and hang on hangers.
Reinsert collar stays if you choose to use them and button the top button of each shirt. Ensure the collar is in a good position, and the collar points are not rolling under the collar. If necessary, touch up with a low-heat iron to sharpen the edges of the front or collar.
Store non-iron shirts hanging on shirt hangers.
Performance Shirt Care Instructions
Your shirt tag will say “Machine Wash Cold, Non-Chlorine Bleach, Machine Dry Low Heat, No Iron”
Prepare the performance shirt by unbuttoning all of the buttons, including cuff and collar buttons. Remove any collar stays and put them in a safe place.
Pre-treat any stains by carefully working a little detergent into them or spot-cleaning with a stain remover pen.
Set up your washing machine: To minimize wear use the Delicate cycle. If the shirt is made from a heavier fabric, or is particularly dirty, you may opt for the Normal cycle. White performance shirts should use warm water. Colored performance shirts should use cold water. Take care not to include other laundry items with bold colors that could bleed onto your shirts.
Use a high-quality detergent, that is appropriate for the color and material of the shirt. Do not use chlorine-based detergents or bleaches as these can discolor your shirts.
Wash the shirts in the washing machine, and let the spin cycle wring most of the water out of them.
Dry the shirts in a machine dryer on a Low setting.
Promptly remove the shirts from the dryer. Fluff and bat them to remove major wrinkles. Put the collar in a nice position and fold the shirts carefully.
Do not iron or steam! Performance shirts use materials that can melt or become permanently distorted when subject to high heat.
Woven performance shirts should be stored differently than knit performance shirts. Woven performance shirts should be stored hanging on hangers. Knit performance shirts should be lightly folded and stacked. Hanging knit shirts on hangers may cause the sleeves and body of the shirts to elongate over time.
Merino Shirt Care Instructions
Your shirt tag will say “Machine Wash Cold, Non-Chlorine Bleach, Hang Dry, Low Iron”
Prepare the merino shirt by unbuttoning all of the buttons, including cuff and collar buttons. Remove any collar stays and put them in a safe place.
Pre-treat any stains by carefully working a little detergent into them or spot-cleaning with a stain remover pen.
Set up your washing machine: To minimize wear use the Delicate cycle. All merino shirt should use cold water. Note, washing in hot water (repeatedly) may cause damage to the shirt. Take care not to include other laundry items with bold colors that could bleed onto your shirts.
Use a high-quality detergent, like Woolite Complete, which is appropriate for the material of the shirt. Do not use chlorine-based detergents or bleaches as these can discolor your shirts.
Wash the shirts in the washing machine, and let the spin cycle wring most of the water out of them.
Lightly shake the shirts to remove wrinkles and hang them on a hanger so they can air dry. Note, drying merino shirts at high heat (repeatedly) may cause damage to the shirt.
Once dry, fluff and bat the shirts to remove major wrinkles. Put the collar in a nice position and fold the shirts carefully.
Merino wool fibers can change when subjected to high heat, so only iron on a low heat setting if necessary. Ironing at high heat may cause a shininess to appear on the fabric or seams to come unraveled. If necessary use light steam sparingly to reduce wrinkles.
Woven merino shirts should be stored differently than knit merino shirts. Woven merino shirts should be stored hanging on hangers. Knit merino shirts should be lightly folded and stacked. Hanging knit shirts on hangers may cause the sleeves and body of the shirts to elongate over time.
Professional Dry Clean Care Instructions
Your shirt tag will say “Professionally Dry-Clean”
We rarely suggest a shirt be dry cleaned, but occasionally it’s necessary. Typically this care method is reserved for shirts made from a particularly fine or rare material that is sensitive to intense heat or that should not be wet.
In some cases, we will recommend this care method for knit shirts that are known to have particularly high shrinkage if they are washed with water.
Wool is the most common natural fiber used for tailored suits, jackets, and trousers. The natural properties of wool, such as its durability, breathability, odor resistance, and wrinkle resistance, make it an ideal choice for tailored clothing. Here we’ll discuss the most common types of wool suiting fabrics, as well as some of the technical terms involved in their classification.
Worsted Wool
Loro Piana Navy S130s Wool Twill
Worsted wool is the smooth suiting fabric you think of when you think of a traditional suit. It’s made from long staple wool which means the pieces of wool that make up each thread in the yarns are particularly long. This naturally reduces the number of thread ends the hand feels when touching the fabric, and therefore makes the fabric smooth to the touch. Different types of sheep produce worsted wool and woolen wool, which has a shorter staple length and results in the“fuzzy” finish associated with wool blankets and wool sweaters. Worsted wool creates the dressiest suiting fabrics and is great for all four seasons. Loro Piana’s Four Season fabrics are made from worsted wool.
“Super numbers” are often included in a worsted wool fabric’s description, and refer to the thread count of these more formal fabrics. High quality suit fabrics are woven with thread counts of 110 or higher. The“S” in front of“S110s,” for example, means“Super,” so you’d call it“Super 110s” or“110 thread count” wool, which indicates the fine nature of the threads. The majority of our suit fabrics have thread counts of S110s or S130s, with some reaching S150s.
“Fresco” refers multi-yarn high-twist wool that’s woven in a plain weave structure. The“high-twist” aspect of the fabric gives it a more open weave which creates comfortable breathability and natural stretch. Fresco wool is also naturally wrinkle resistant, which makes it a great choice for the frequent traveler, and it can be produced to be both lightweight for warmer weather and heavier for comfortable year-round wear. The wool of our fresco fabrics is not combed before the yarn is spun for a softer hand feel.
The loose weave of fresco fabrics results in a lower thread count, so they don’t usually have super numbers, although there are occasionally exceptions to this rule.
Tropical Wool
Marzotto Charcoal Stretch Tropical Wool
Tropical wools have a lightweight construction that makes them particularly breathable and therefore ideal for mild and warm climates.
While some tropical wools can also be fresco wools(and vice versa), the key difference between the two fabrics is that tropical wools are appropriate for warmer climates and weather and frescos can be lightweight too but can also be woven to be heavier and appropriate for year-round wear.
The loose weave of tropical fabrics results in a lower thread count, so they generally don’t have super numbers.
Merino Wool
Vitale Barberis Canonico S110s 100% Merino Wool Black Twill
Merino wool is grown only by merino wool sheep and is an excellent choice for year-round suiting. The naturally crimped shape of its fibers trap air, providing natural temperature regulation and quickly wicking moisture away from the body to keep you warm when it’s cold and cool when it’s hot. Merino wool has natural stretch as well, so it maintains its shape well over time. It has a smooth finish and gentle drape that make it very versatile and adaptable to most occasions, climates, and styles.
Merino wool’s fine, long-staple threads give it a high thread count, so you’ll often find that S110s or S130s wool is either 100% merino wool or contains merino wool. Many of our suits, jackets, and trousers are made with 100% merino wool, or have merino wool blended with other natural fibers. Merino wool can also be a type of worsted wool.
Wool Blends
Drago Slate Houndstooth Wool and Linen Blend
Wool is frequently blended with other natural and synthetic fibers to create different textures, appearances, and performance characteristics in suiting fabrics. For example, cashmere adds softness and warmth for cold-weather wear; silk adds strength and smoothness; and linen lightens the fabric for breathability in hot weather and creates a slubby texture. We like to experiment with different wool blends at any time of year, though our summer blend fabrics—composed of merino wool, linen, and silk—are a particular favorite for our Bedford sport coats in the warmer months.
These types of fabrics will generally not have super numbers, as the addition of non-wool materials increases the thickness of the yarns and often results in a more textured(as opposed to fine) hand.
Our President Collar Series is a group of collars that feature versatile shapes and universally flattering proportions. We designed these collars to be both modern and timeless, with premium construction techniques and materials that will last as long as your shirts do(a very long time). They’ve been part of our core shirt design offering since Proper Cloth was founded.
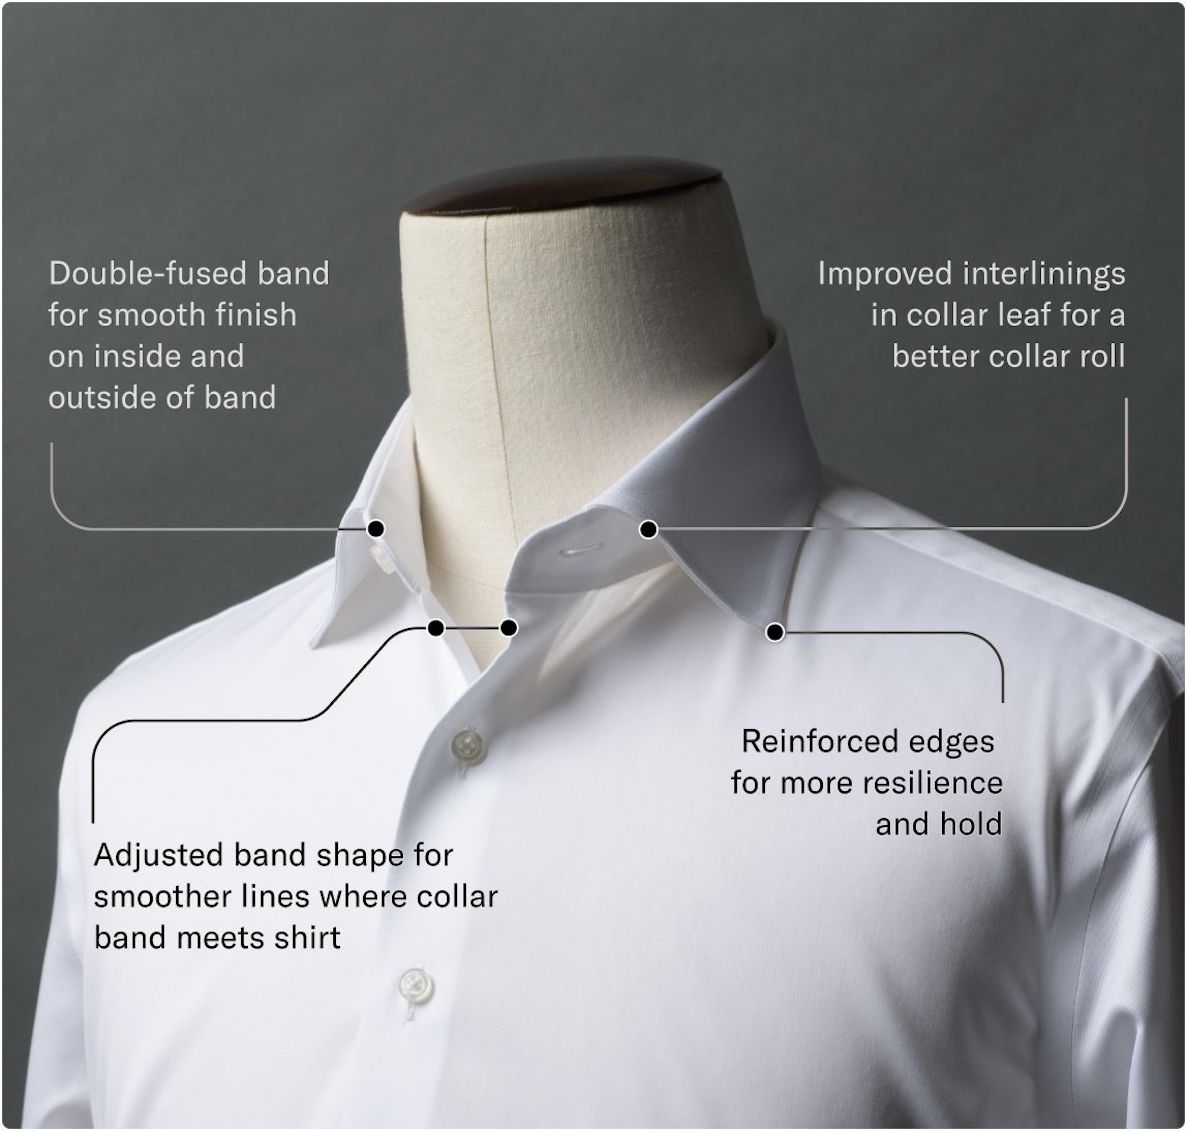
As of August 4th, 2021, we updated all six collars in the President Series with some improvements that make them even better:
We re-engineered the shapes of the collars while maintaining the original dimensions;
Sourced new interlinings for the fused collars to provide a crisper look that still allows flexible roll(President Spread, President Semi Spread, President Cutaway, and President Button Down);
Reinforced the collar edges and points for better resilience and hold;
Adjusted the band shape for smoother lines where the collar band meets the shirt.
The overall benefits of these updates?
More attractive collar leaf roll;
Reduced possibility of front placket bump;
Better positioning around the neck;
Improved longevity and style.
The Collars: Updates & Specifications
Some of the key updates made to the President Collar Series.
The following lays out the updates that were made to each individual collar in the President Series, as well as the aspects of each design that remain consistent with the previous iteration.
President Spread
Shape: New straighter collar band with updated leaf contour(to align with the new band shape)
Specs: Same as previous version: 3 1/8″ collar points, 5 1/2″ spread, 1 1/4″ front collar band height, 1 1/2″ rear collar band height, 1/4″ tie space
Interlining: New interlining gives support that is slightly crisper than previous version, yet is still flexible to allow roll
Construction: New construction strengthens collar edges and points and improves collar roll
Appropriate For: Business, Formal, Business Casual
Soft President Spread
Shape: New straighter collar band with updated leaf contour
Specs: Same as previous version: 3 1/8″ collar points, 5 1/2″ spread, 1 1/4″ front collar band height, 1 1/2″ rear collar band height, 1/4″ tie space
Interlining: Same as previous version: Non-fusible, woven
Construction: Same as previous version
Appropriate For: Casual, Business Casual
President Semi Spread
Shape: New straighter collar band with updated leaf contour
Specs: Same as previous version: 3 1/8″ collar points, 4 1/2″ spread, 1 1/4″ front collar band height, 1 1/2″ rear collar band height, 1/4″ tie space
Interlining: New interlining gives support that is slightly crisper than previous version, yet is still flexible to allow roll
Construction: New construction strengthens collar edges and points and improves collar roll
Appropriate For: Business, Formal, Business Casual
President Cutaway
Shape: New straighter collar band with updated leaf contour; leaf outer edge shape(scope) also improved
Specs: Same as previous version: 3 7/16″ collar points, 6 3/8″ spread, 1 1/4″ front collar band height, 1 1/2″ rear collar band height, 1/4″ tie space
Interlining: New interlining gives support that is slightly crisper than previous version, yet is still flexible to allow roll
Construction: New construction strengthens collar edges and points and improves collar roll
Appropriate For: Business, Formal, Business Casual
Soft President Cutaway
Shape: New straighter collar band with updated leaf contour; leaf outer edge shape(scope) also improved
Specs: Same as previous version: 3 1/2’’ collar points, 6 3/8’’ spread, 1 1/4’’ front collar band height, 1 1/2’’ rear collar band height, 1/4’’ tie space
Interlining: Same as previous version: Non-fusible, woven
Construction: Same as previous version
Appropriate For: Casual, Business Casual
President Button Down (formerly Button Down 2)
Shape: New straighter collar band with updated leaf contour; leaf outer edge shape(scope) also improved
Specs: Same as previous version: 3 1/4″ collar points, 3 1/2″ spread, 1 1/4″ front collar band height, 1 1/2″ rear collar band height, 1/4″ tie space
Interlining: New interlining gives support that is slightly crisper than previous version, yet is still flexible to allow roll
Construction: New construction strengthens collar edges and points and improves collar roll
Appropriate For: Business, Business Casual, Casual
The President Series is central to our design story, offering versatility for men of all statures in a wide variety of situations. We made these changes because we want to give you the absolute best options for your custom shirts. With improved materials, construction, and design, we hope you love wearing these collars as much as we do.
Not all pant changes require a full remake. If the adjustments to your pants size are minor, it may make more sense to have them altered locally by a tailor, which we’re happy to reimburse for store credit. It’s up to you.
What Dimensions Can Be Altered by a Tailor?
The following alterations can be made by a local tailor:
For Casual Pants:
Slimming the waist up to 1”
Slimming the hips/seat up to 1”
Shortening the inseam up to 4”
Slimming the pant leg up to 1”
Reducing the leg opening width up to 1.5”
For Dress Pants (Tailored Clothing)
Widening the waist up to 1”
Slimming the waist up to 1”
Slimming the hips/seat up to 1”
Shortening the inseam up to 4”
Lengthening the inseam up to 1”
Slimming the pant leg up to 1”
Reducing the leg opening width up to 1.5”
Finding a Tailor and Completing Alterations
Having your pants altered locally is up to you. We don’t have specific tailors to recommend. If you don’t have a tailor that you trust, try searching online for one in your area with a good reputation. When you meet with them, you can usually tell them exactly what you want to change, or you can put the pants on with them and together determine what alterations make sense.
Important: Note the Size Changes
We strongly encourage you to take note of what changes your tailor makes to the pants so that you can update your saved pant size for future orders. Our support team is always happy to help update your profile for you.
A Potentially Faster Alternative
In some cases, having your pants altered locally can be faster than requesting a full remake. Check here for current delivery times for Casual Pant or Tailored Clothing remakes (remakes have the same delivery times as new orders). This may be especially helpful if you need the pants for an upcoming event and are short on time.
Requesting Tailoring Credit/Reimbursement
Once you’ve had the alterations done, email a photo of the receipt along with the Proper Cloth order number to contact@propercloth.com. We’ll reimburse (as store credit) up to $30 for a Casual Pant alterations and $50 for Dress Pant alterations.
We are dedicated to helping you get the perfect Casual Pant fit, and to support that we provide each customer up to two complimentary Casual Pant remakes, as well as credit for local tailoring. Click here to learn more about our Perfect Fit Guarantee.
Requesting a Casual Pant Remake
Step 1: Wash the Pants Once (Optional)
All of our Casual Pants are garment washed before they leave the factory so most shrinkage should have already happened once you receive them, but if you’re worried about shrinkage you can certainly wash them yourself to be sure.
Washing your Casual Pants once or twice will not disqualify you from returning them later for a remake or refund.
Step 2: Give Them a Wear
It’s important to try your pants with the shoes, shirt, and jacket you expect to wear them with. This will help you understand if they are the right slimness to match the rest of your wardrobe and if they are the right length where they meet your shoes.
Many Casual Pant fabrics will loosen in the waist, hips, and thigh after being worn for a couple hours, so an extended wear can also be helpful to evaluate your fit.
Wearing your Casual Pants for a full day to test the fit, while not necessary, will not disqualify you from returning them later for a remake or even a refund.
Step 3: Determine What Needs to Change
Option 1: Conduct Your Own Fit Assessment
If your pants are close to perfect and you’re confident you know what needs to change, you can conduct your own fit assessment and request a remake yourself without any assistance.
Request your remake by going to your Order History, clicking ‘Order Details’, then the“Request a Remake” button. Follow the prompts to specify the size or style changes you want to make, confirm your shipping address, and submit the remake request.
After we review your photos and notes, we’ll respond to the Fit Advice Request with our size change recommendations saved to a new profile for your convenience. From there, our Customer Experience Team will guide you through the remake process.
Examples of good fit photos.
Option 3: Schedule a Showroom Appointment
Another way to get fit advice and request a remake is to visit one of our physical locations. Book an in-person appointment through our online schedule.To make the most of your in-person consultation we suggest:
Bring(or wear) the casual pants you purchased to your appointment. If you wear them, also bring a spare pair to wear home so you can leave your purchased pair when you’re done.
Wear the style of shirt and shoes you typically plan to wear with the pants.
If you have another pair of pants that you like the fit of better, bring those along.
At your in-person consultation, we will review your fit together and discuss what to change. You will also be able to try on other pants we have in the showroom, or shop for other items entirely.
After (or during) your consultation, your fit specialist will process your complimentary remake for you.
Step 4: Return Your Pants
After you’re finished evaluating the fit of your pants and your complimentary remake has been processed, we ask that you return your pants to one of our locations. To mail your garment back, you can reuse the original packaging. A return shipping label will have been included in your original delivery.
If you’re reusing the box your order arrived in, be sure to either remove the original postage information or apply the USPS label on top of the original. The address for Remake Returns is:
Proper Cloth – Returns
495 Broadway, 2nd Floor
New York, NY 10012
Alternatively, you can drop your pants off at any of our locations.
The Five Types of Fit for Proper Cloth Casual Pants
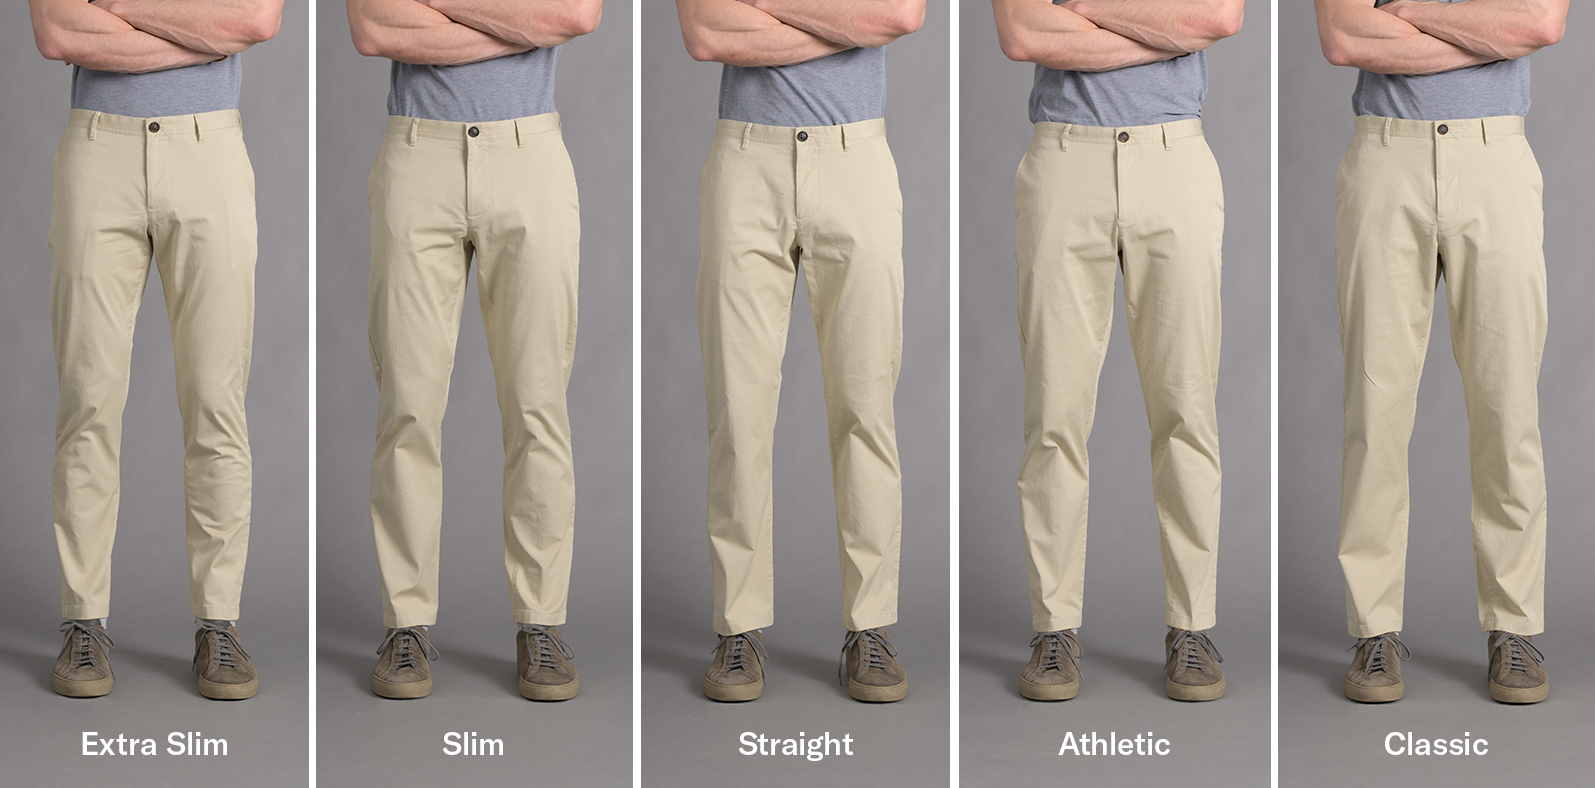
Proper Cloth casual pant (chino, 5-pocket, jean, fatigue) fit options are based on both body type and style preferences. The type of fit you select will affect the room you have in the upper pant, as well as the fit in the pant leg and the taper to the leg opening. Proper Cloth casual pant sizes can be generated in 5 different styles of fit: Extra Slim, Slim, Athletic, Straight, and Classic Fit. With our advanced made-to-measure system, these dress pant fit styles can be fine-tuned even further in many specific dimensions.
Extra Slim Fit
Extra Slim Fit is a progression from our popular Slim Fit with narrower dimensions through the hips and legs with a smaller leg opening. This fit is great for thinner guys or guys who want a particularly slim fit with significant taper. Extra Slim Fit is not a skin-tight“skinny” fit, and will still be work appropriate for slimmer men in relaxed offices.
Extra Slim Fit Casual Pants
Slim Fit
Slim Fit is our most-popular, office-appropriate, slim-but-not-tight fit. It’s suggested for average-size guys who want a clean, tailored look that will still drape from the thigh down. It’s significantly narrower than our Classic fit through the hips and leg, and has a noticeable taper from thigh to leg opening, but is not as slim as Extra Slim.
Slim Fit Casual Pants
Straight Fit
Straight Fit is similar to our Slim fit in the hips and thighs, but with minimal taper from thigh to knee to leg opening. It has a wide leg opening that will easily fit over bulky boots, or cover more of the shoes.
Straight Fit Casual Pants
Athletic Fit
Athletic Fit is roomier than Slim fit in the seat and thighs, but still tapered to the knee and leg opening. If you have particularly large hips or thighs, but still want a slim fit, this is a good choice for you.
Athletic Fit Casual Pants
Classic Fit
Classic Fit is more relaxed than Slim Fit in the hips and thighs, with significantly less taper through the knee and leg opening. It’s great for guys who want a roomier fit with traditional proportions and a wider leg opening that covers more of their shoes.
The Camp shirt, sometimes called “camp collar” or “revere shirt,” is an easy casual piece that’s made a comeback in recent years. It calls to mind the carefree style of icons like Ernest Hemingway and Sean Connery as James Bond circa Thunderball—men with a rebellious edge who embraced the elevated leisurewear look. Here we provide a bit of background about the genesis of the Camp shirt, and how to create the perfect fit for your Proper Cloth Camp shirt.
History and DNA of the Camp Collar
The origins of the Camp shirt can be traced back to 19th-century Filipino and Cuban shirt styles. It was introduced to the United States largely by Cuban men who migrated to Miami and New York in the late 1950s and’60s during the exodus after the Cuban Revolution. Style-wise, the Camp Shirt is related to the Cuban Guayabera, the classic bowling shirt, the safari shirt, and the Hawaiian Aloha shirt.
The Camp shirt was mostly inspired by short sleeve, lightweight work shirts Cuban men wore to keep cool while working outdoors in hot weather. The design was much more relaxed than that of the dress shirts worn by most American men at the time of its introduction—a refreshing escape from the buttoned-up and suited looks that were so prevalent in the lives of many men of the time. The Camp shirt became a summer staple in North American style for its comfort in the heat, and because it represented an idealized laidback lifestyle than most men were able to have in reality.
A classic Camp shirt design in a unique, modern fabric.
Creating Your Camp Collar Shirt Size
Since Camp shirts will fit differently from your typical dress shirts, we recommend you adjust your usual shirt size and save a separate size specifically for Camp shirts.
The Fit: Boxier than your more formal dress shirts
The relationship between the measurements of the Midsection and Bottom Widths of your Camp shirt is the most important factor in achieving a classic, unfussy look. These shirts are intended to have a roomy fit and boxy appearance, so they shouldn’t hug your torso or fit too close to the body. The Bottom Width should be increased to ensure it isn’t tight around your hips; how much it’s increased will depend on the size you’re starting with. To specify the Bottom Width, click ‘Automatic’ and manually change the measurement. The Midsection Width should be no more than 0.5″ smaller than the Bottom Width in order to avoid creating a curved silhouette. The less noticeable the difference between these two areas of the shirt, the better.
A seersucker Camp shirt with a Straight Hem.
The Straight Hem: Reduce Shirt Length
We recommend reducing the shirt length for shirts designed with straight hems because the lack of rise and the side gussets makes Straight Hem shirts look and feel longer than Rounded Hem shirts when they’re untucked. The Camp shirt is typically worn untucked with a Straight Hem and having the appropriate shirt length is therefore crucial to achieving the perfect look and fit. The Back Length for a casual shirt with a Straight Hem should be 2-3” shorter than a traditional tucked-in dress shirt. This is about 0.5” shorter than your typical untucked casual shirt with a Rounded Hem.
The collar and top button placement of a Camp shirt show more chest than you might be used to.
Keep in Mind: The lower top button and looser neck
If you’re interested in wearing a Camp shirt you should be comfortable showing a bit more chest than you usually might. The Camp collar and front design includes a lower top button placement, and the lack of structure in the collar and placket exposes more neck and chest. We recommend leaving 1 or 2 buttons open below the collar to achieve the perfect laidback look. Consider lowering the Top Button Placement to further widen the collar opening, and increasing the Collar Around by .75″-1″ to allow the collar to sit a little lower on your chest and away from the neck. Note: The button loop on the Camp Collar design is for show and should never be buttoned.
If you already have a short sleeve size and the Short Sleeve Length is on the shorter side, you’ll want to increase it to ensure it hits at the middle of your biceps. This is key to achieving an easygoing look. A good rule of thumb is for the end of the short sleeve to hit about 4″ above your elbow. Any shorter and the fit will be a little too sleek for a classic Camp look, while a short sleeve that’s much longer will start to look like it doesn’t fit you.
If you’re looking for more on this iconic camp collar shirt, check out this post from Robb Report. or screen any vintage movies set in warm climates from the 1960s to the 1980s.
When customizing your trousers, it’s important to consider the statement you want them to make for you.Traditional or modern, formal or casual—thedesign details you choose will contribute to the overall impression of your outfit.
Designing Trousers for Work
A Business Fit
Trousers worn in a traditional office setting tend to have more classic and subtle details. Most people opt for a more conservative fit—a half break to full break inseam length, with a slightly tapered leg. Reserve the extra–slim fit for more casual settings.
Wool Fabrics
Wool, in a variety of weave types, blends, finishes, is the most common business trouser fabric. It’s considered more professional and suitable for office settings than other, mainly lighter, fabrics like pure cotton and linen. Darker shades and solid colors are most appropriate, like shades of navy blue and dark or charcoal grey.
Classic Design Details
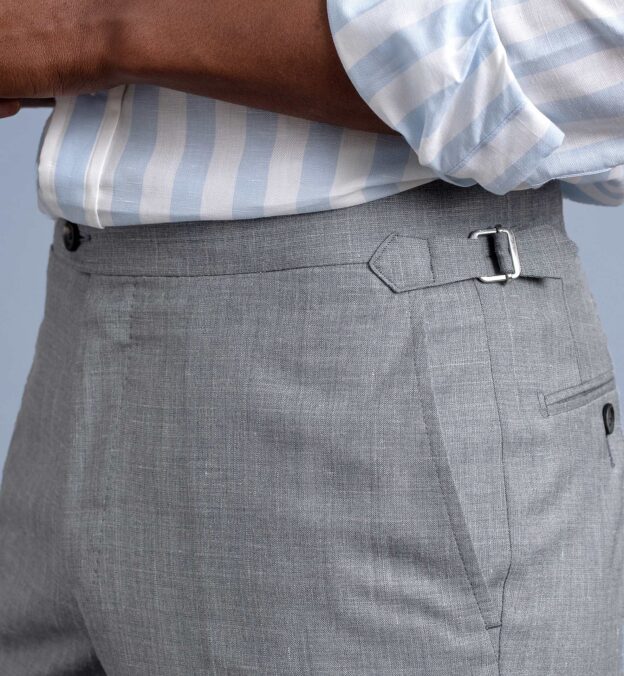
When it comes to styling your business trousers, the classic American style keeps it simple and conservative. Belt loops are the more traditional choice for office wear, but if you’d prefer a more streamlined, modern look you can add side tab adjusters instead. Most work trousers are styled with buttons that blend in to the fabric color—usually dark brown or charcoal—as contrasting colors that stand out are distracting and less formal. Cuff choices are generally determined by personal preference and style, as they do not affect the formality of your trousers. Adding 1.5” – 1.75” cuffs will create a classic and conservative look, while a tall 2” cuff will be more of a statement. Forego the cuffs altogether if you’re going for more sleek and minimal look.
Designing Casual Trousers
A Casual Fit
Casual trousers allow for more creative freedom in the design of the garment. The fit can be as loose or slim as you like, and the inseam can be shorter than your work trousers if you’re aiming for a modern look. The pursuit in recent years of a more retro-casual vibe has increased the popularity ofcombining shorter inseams(no break and negative break) with a more pronounced taper in the lower leg as well.
Casual Fabrics
While many wool fabrics work well for casual trousers, there’s a whole host of other options when it comes to the materials you can choose for them. Patterns, light colors, pronounced textures, and combinations thereof give expression to a more relaxed vibe. Linen, cotton, flannel, and corduroy are popular materials that add interesting visual texture, that will ground your look especially when you forego the jacket. Be on the lookout for unique blends of these types of fabrics for interesting pieces with good levels of performance.
Relaxed Design Details
The style details of your casual trousers can be as similar to or different from your work trousers as you’d like. While belt loops and a standard waistband are acceptable in all settings, side tab adjusters and an extended waistband can help to add a little modernity and flair to your casual outfits. Most people will choose to skip the cuffs on casual pants, though it is still an acceptable style detail for all settings.
Designing Formal Trousers
A Classic Fit
When it comes to formal events, particularly those calling for black tie dress, a traditional silhouette is key. A timelessly tailored trouser is the way to go. You probably won’t be wearing your tuxedo too often, but every time you do in the years to come, you’ll thank yourself for steering clear of trendy extremes. A slim but comfortable fit through the leg will never go out of style. A half break at the top of the shoe is similarly always safe.
Formal Fabrics
Pure wools in solid colors, always. A classic black tuxedo pant can be a little more versatile than one imagines if you’ve invested in an additional dinner jacket to add some variety to your black tie look. Seasonality can be factored in of course, but the texture of the fabric should always remain subtle. A solid black, charcoal, or navy linen/wool blend is perfect for a summer wedding, just as a dark gray or navy flannel for winter events.
Formal Design Details
For traditional black tie, you’ll want to apply a satin or grosgrain stripe down the leg, matching the lapels of the jacket. This finishing is the default for Proper Cloth’s tuxedo trousers.
One thing you’ll never see worn with a tuxedo is a belt. Always opt for side tab adjusters to finish the waist in a clean, minimal fashion. Traditionally, tuxedo pants should also be worn with suspenders, which are provided by default with Proper Cloth’s tuxedo trousers(though they can be selected for any custom tailored trouser).
The origins of the Aloha shirt can be traced back to 1920s and early 1930sHawaii. It was inspired by and first made out of Japanese work kimono fabrics, and took the name“Aloha” from the propensity of the 1930s public to add that tag to anything that originated in Hawaii. The Aloha shirt gained popularity during the Great Depression, as it represented the idyllic, carefree, untroubled life people longed to be living at the time. Since then, the Aloha shirt has evolved as a warm-weather fashion statement, and to this day evokes the same cool, laidback look we still aim to capture.
A colorful Aloha shirt with a traditional print.
How to Design Your Aloha Shirt
Choosing a Fabric
Today’s Aloha shirts are generally made from rayon, a cellulose fiber similar to Lyocell, Tencel, and bamboo, but you can recreate the Aloha shirt look withjust about any casual summer fabric and the right design details. Cotton and linen blends, pure linen, and seersucker are fair game, but avoid classic dress shirt fabrics likecotton twills and royal oxfords, as these will result in a more formal look.
Fun prints and bright colors are a major defining feature of traditional Aloha shirts. They often depict tropical scenes and ocean imagery, including anything from flowers and surfers to cocktails and tigers. You can, however, try solids or stripes if you want to go a more subdued route. The right design details will help give a less vibrant fabric an“Aloha” sensibility.
Aloha Shirt Design Details
Camp Collar. The Camp Collar is the quintessential casual collar, often seen on short sleeve summer shirts. It’s completely unfused and has no collar band which gives it a relaxed lack of structure. In our Design-a-Shirt tool, selecting the Camp Collar automatically adds a plain“no placket” front to the shirt to maintain aconsistently casual shirt design.
Short Sleeves. Short sleeves are the only way to go for the classic Aloha shirt look.
Pocket. A single left chest pocket is the most classic Aloha shirt style. It’s also a great place to put those sunglasses, cigars, and drink tickets.
Straight Hem. You’ll want to opt for a straight hem if you plan on wearing your shirt untucked(which we recommend).
Coconut Buttons. Choose coconut buttons for the most authentic look, but feel free to have fun with other options, too. Match a fabric with a blue ground with our Slate Horn buttons, or go luxe with Australian Mother of Pearl.
A relaxed-fit Aloha shirt, tucked into trousers.
Achieving the Relaxed Fit
The Aloha shirt represents a laidback sensibility, and fit is an integral part of that. The midsection of the shirt should not be much smaller than thechest width, so as to avoid the more formal“hourglass” silhouette typical of business shirts. For example, if your shirt’s chest width measures 20″, a midsection width of no less than 18.5″ would work nicely. We also recommend looser sleeves, as fitted ones won’t offer an easygoing look. Overall, keep the fit loose and comfortable to give your Aloha shirt the relaxed, on-a-beach-somewhere vibe it’s best known for. Tips for creating a custom short sleeve shirt size.
An Aloha shirt styled with a casual suit.
How to Wear the Aloha Shirt
How many buttons should be left unbuttoned? To keep with the casual, laidback look, we recommend wearing 1-2 buttons open below the collar. How low you go is primarily personal preference, and depends on how relaxed you want to look. Generally,the collar button and loop on the Camp Collar is simply for show and should never be buttoned.
Tucked or untucked? The shirt is most commonly worn untucked, especially with shorts, casual pants, or a swimsuit. It pairs well with linenandvintage denim in particular. You can certainly wear your Aloha shirt tucked in—preferably with linen or cotton trousers or unstructured suiting—for a smarter summer look.
This iconic shirt has such a presence in style that even the Smithsonian did a write-up. No matter how you rock it – or where – this breezy, legendary garment has a spot in almost any wardrobe.
Choosing a collar style can be difficult if you’re not aware of your options. In this post, we break down all of the collar styles you might encounter on a dress shirt and discuss the appeal of each one.
Spread Collar
The Spread Collar
The most common dress shirt collar. It’s a timeless option that features collar points that end between 4″-6″ apart from one another. This collar style accommodates both small and large tie knots due to the space between the collar leafs. Spread collars are generally very versatile and can be worn easily with a jacket and tie or on their own.
Straight Point Collar
The Straight Point Collar
The straight point collar features collar points that finish from 1.5″-3.5″ from one another. There is less room between the collar leafs than in a spread collar, which means it’ll accommodate a slimmer tie knot rather than a larger one. A classic look, this collar can have a visually slimmer effect for those with round face shapes.
Button-Down Collar
The Button-Down Collar
Invented by Brooks Brothers in 1896, the button-down collar features buttons that fasten the collar points of the shirt. It was originally used on sport shirts rather than dress shirts. While button-down collars are occasionally dressed up with suit and tie looks, it still remains a more casual option than spread or point collar shirts.
Cutaway Collar
The Cutaway Collar
The cutaway collar has seen a big resurgence in menswear over the last few years and is generally a bold dress shirt collar style. The distance between the collar points on a cutaway collar are generally between 6.5″-8.5″, the largest spread you’ll find on a shirt collar. It accommodates large tie knots easily and looks very sharp, but is generally too aggressive for most corporate workplaces.
Club Collar
Club Collar
The rounded club collar became popular after The Eton School in England instituted it in their wardrobe in the 19th century. The collar points are always rounded and it can come in either spread or point collar styles. It has a distinctly vintage feel, and works very nicely for those who want a unique look for a tailored wardrobe.
Wingtip Collar
The Wingtip Collar
The most formal collar option, the wingtip collar is made primarily to be worn with a bowtie and tuxedo. It got its name from the fold-out collar points, which look like wings.
Tab Collar
The Tab Collar
The tab collar is a lesser seen option that features a small button between the collar points. British in origin, this collar props up your tie knot–making it more pronounced.
Hidden Button Down
The Hidden Button-Down Collar
Another less common collar style, the hidden button-down features buttons on the inside of the collar points rather than ones that go through the collar points. This makes the collar appear to be a classic spread or point collar, but gives the points support so that they stand up consistently.
Band Collar
The Band Collar
A band collar is a collar that features no collar leaves. This is typically a more casual collar option, but the Mandarin Collar is a more rigid, formal variation of the band collar.
Camp Collar
The Camp Collar
Typically seen on Hawaiian shirts and bowling shirts, the Camp Collar is a quintessential casual collar. Completely unfused and relaxed, it’s right at home on the beach, but don’t be afraid to experiment with heavier fabrics, or to dress up this collar by pairing with tailored clothing.
As always, the guys over at Gentleman’s Gazette have a good write-up of collar styles with a bit more of a traditional lens.
A jacket in need of a Prominent Chest adjustment (left) vs. a jacket that fits properly (right).
How the Chest Should Fit
The perfect fit of a jacket at the chest is a matter of personal preference. If you prefer a more relaxed fit, you can make the chest as large as you like. If you desire a tailored, slim look, you’ll want to reduce the Chest Width as much as possible without going so tight that it impacts comfort or produces unattractive pull lines across the chest. The fit of the chest should be about equal all the way around the jacket, at the front of the chest and at the back.
How the Chest Posture Adjustment Works
Changing this setting moves fabric from the back of the jacket to the front. The overall chest measurement remains the same; fabric is simply redistributed to achieve the optimal fit. This adjustment increases the front Chest Width by 1”.
Determining the Optimal Chest Posture Setting
With the top front button closed, stand up straight with your arms at your side. Look straight ahead and be sure to keep your shoulders relaxed and comfortable (don’t push your shoulders back or hunch them forward at all).
In this position, if you experience tightness at the chest front and simultaneously have excess fabric around the middle to upper back of the jacket, a Prominent Chest adjustment can improve your fit. It can alleviate chest front tightness and allow for a cleaner look on the back of the jacket. If you have a very slim fit, be aware that this adjustment will give you less range of motion when reaching up above or in front of you.
Measuring tailored suit jackets and sport coats can be tricky, but taking the following precautions will produce the best results:
1. Button the jacket up fully.
2. Lay the garment on a flat, hard surface to ensure accuracy.
Shoulder Width
Lay the jacket face down. Use your hands to smooth and flatten out the body of the jacket. Measure from where the shoulder seam meets the sleeve on one side of the jacket straight across to where the shoulder seam and sleeve meet on the other side.
Chest Width
Lay the jacket on its back. It’s important that the jacket is buttoned up fully. Use your hands to extend and flatten out the chest and torso completely. The bottom front hem (quarters) of the jacket should fall below the back hem of the jacket, such that the jacket can lay as flat as possible along the sides. Pop the collar up such that the lapels lay over each other as flatly as possible. Position the sleeves pointing up so that you can find the absolute corner where the side of the jacket meets the armpits. Measure from this point straight across the suit jacket to the opposite edge where the armpit and torso meet.
Midsection Width
With the jacket laying on its back and fully buttoned, again use your hands to extend and flatten out the torso completely. Measure straight across from one edge of the jacket waist to the other edge. On a two button jacket, position the measuring tape straight along the top button. On a 3 button jacket, the measuring tape should pass right through the middle button.
Hip Width
With the jacket laying on its back and fully buttoned, again use your hands to extend and flatten out the body of the jacket completely. Measure straight across from one edge of the jacket’s hips to the other edge. On a two button jacket, position the measuring tape horizontal across the body, starting 6″ below the top button. On a 3 button jacket, the measuring tape should cross the body horizontally, 6″ below the middle button.
Center Back Length
Lay the jacket face down. Pop the collar such that the melton (felt) is visible beneath the collar. Starting from the intersection of the back, collar and center back seam, measure down along the center back seam to the bottom hem of the jacket.
Sleeve Length
Lay the jacket face up. Use your hands to smooth and flatten the sleeve down alongside the body. Measure from the beginning of the sleeve where it meets the top shoulder seam, following the curve of the padding at the head of the sleeve before rotating straight down to the end of the cuff.
Sleeve Bicep Width
Lay the jacket flat on its back. Pull the sleeve straight out to the side. The measurement should be 1” from the armpit up to the top of the sleeve, in a line that is perpendicular to the top of the sleeve.
Sleeve Opening Width
Lay the jacket on its back and use your hands to smooth out the sleeve. With the cuff fully buttoned, spread it flat and measure across from side to side.
Proper Cloth provides a wide range of custom design options for our shirts, pants, jackets and suits. Virtually any shirt, pant, or tailored jacket on the site can be modified both in terms of size and its design elements.
We Cannot Customize Product Designs Beyond the Options Displayed
While we offer a wide range of customization options for our shirts, pants, jackets, and suits, we do not provide a limitless amount.
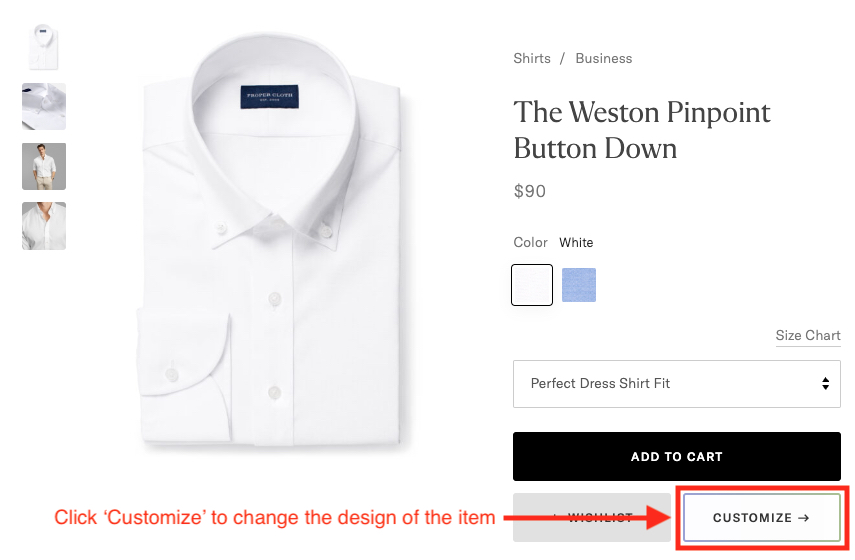
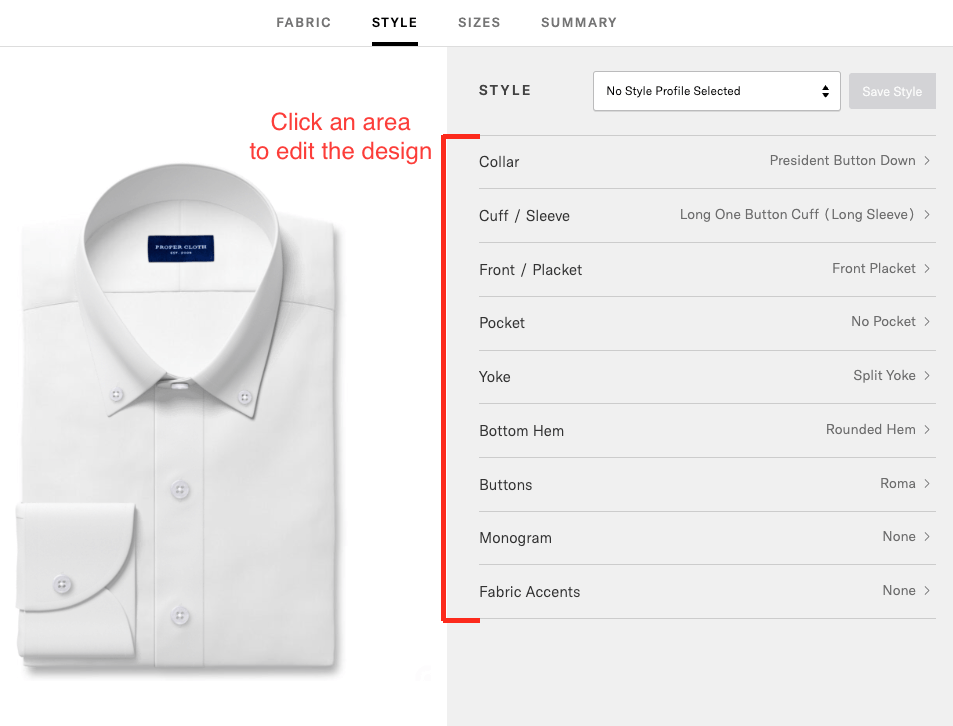
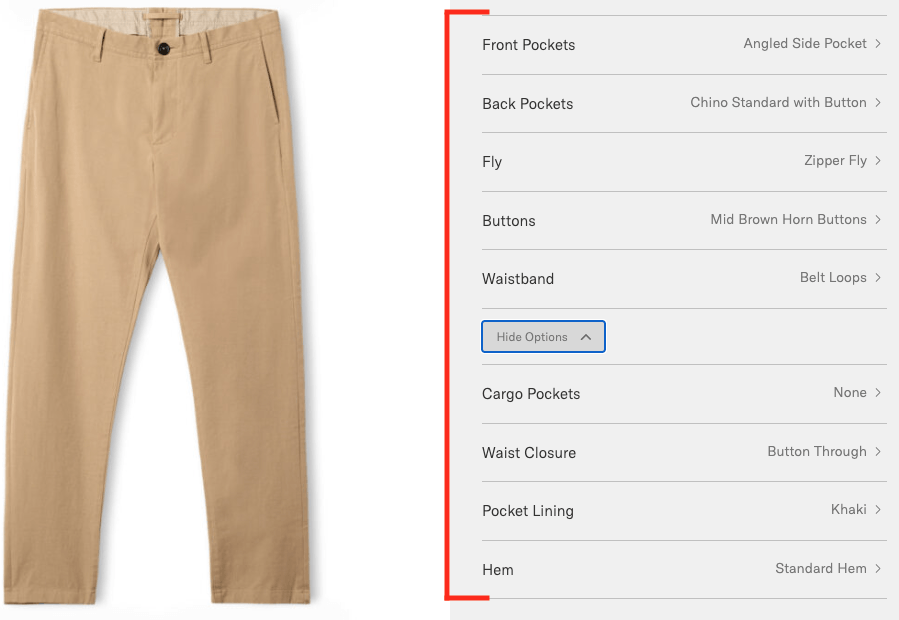
Clicking on ‘Customize’ next to a photographed garment will display all of the areas in which the design can be modified. However, garments cannot be modified beyond the specifications displayed in our customization interfaces.
If the design option is not present in our customization interface, we do not offer it and cannot do so by special request.
Providing Suggestions
If you’d like to send us new style suggestions, we’re happy to take them into consideration. Who knows, maybe if enough folks demand the “Pat Riley while coaching the 1987 Lakers” collar, we’ll give it a shot.
Use our ‘Contact Us‘ form to send in your suggestions.
We are dedicated to helping you get the perfect Tailored Clothing fit, and to support that we provide each customer up to two complimentary jacket remakes and up to two complimentary dress pant remakes, as well as credit for local tailoring.More about Proper Cloth’s Perfect Fit Guarantee.
Requesting a Tailored Clothing Remake
Step 1: Wear Your New Garments
It’s important to try out your jacket or pants with the shoes, shirt, jacket, or pants you expect to wear them with. This will help determine if they have the right silhouette to match the rest of your wardrobe and if the pants are the right length where they meet your shoes.
Step 2: Request the Tailored Clothing Remake
There are several ways to request your Tailored Clothing remake:
Option 1: Conduct Your Own Fit Assessment
If your tailored jacket and/or pants are close to the right fit and you’re confident you know what needs to change, you can conduct your own fit assessment and request a remake yourself without any assistance.
Request your remake by going to your Order History and clicking the button “Request a Remake” in the Tailored Clothing section of the page. Then follow the prompts to specify the size or style changes you want to make to either (or both) the jacket/pants, confirm your shipping address, and submit the remake request.
Option 2: Request Fit Advice from Proper Cloth
If you’re not loving how the garment fits but aren’t sure of what needs to change, we are more than happy to assist!
After we review your photos and notes, we’ll respond to the Fit Advice Request with our size change recommendations saved to a new profile for your convenience. From there, our Customer Experience Team will guide you through the remake process.
Option 3: Schedule a Showroom Appointment
Another way to get fit advice and request a remake is to visit one of our physical locations. Book an in-person appointment through our online schedule. To make the most out of your in-person consultation we suggest:
Bring(or wear) the garments you purchased to your appointment. If you wear them, also bring some spare clothes to wear home so you can leave your purchased garments with us when you’re finished.
Wear the style of shirt, jacket, pants, and shoes you plan to wear with the outfit.
If you have another jacket or pair of pants that you like the fit of better, bring it along.
At your in-person consultation, we will review your fit together and discuss what to change. You will also be able to try on other standard size jackets and pants we have in the showroom, or shop for other items entirely.
During or after your consultation is complete, your fit specialist will process your complimentary remake for you.
Step 3: Return Your Tailored Clothing
After you’re finished evaluating the fit of your garments and your complimentary remake has been processed, we ask that you return your tailored clothing to one of our locations(in person or via mail). To mail your garment back, you can reuse the original packaging. A return shipping label will have been included in your original delivery. If mailing the garments back, please send to this address:
Proper Cloth – Returns
495 Broadway, 2nd Floor
New York, NY 10012
Having Your Tailored Clothing Altered Locally
Not all changes require a full remake. If the adjustments to your Tailored Clothing sizes are minor, it may make more sense to have them altered locally by a tailor, which we’re happy to reimburse with store credit.
Dimensions That Can Be Altered by a Tailor
Alterations that could make sense to do with a local tailor include:
Jackets
Shortening the sleeve length up to 0.5”
Lengthening the sleeve length up to 0.5”
Slimming the midsection up to 2”
Moving the collar back up to 1”
Dress Pants
Widening the waist up to 1”
Slimming the waist up to 1”
Slimming the hips/seat up to 1”
Shortening the inseam up to 4”
Lengthening the inseam up to 1”
Slimming the pant leg up to 1”
Reducing the leg opening width up to 1.5”
Finding a Tailor and Completing Alterations
Having your garments altered locally is up to you. We don’t have specific tailors to recommend. If you don’t have a tailor that you trust, try searching online for one in your area with a good reputation. When you meet with them, you can usually tell them exactly what you want to change, or you can put the garments on with them and together determine what alterations make sense.
Important: Note the Size Changes
We strongly encourage you to take note of what changes your tailor makes to the garments so that you can update your saved sizes for future orders. Our support team is always happy to help update your profile for you.
A Potentially Faster Alternative
In some cases, having your garments altered locally can be faster than requesting a full remake. Check here for current delivery times for Tailored Clothing remakes(remakes have the same delivery times as new orders).
Requesting Tailoring Credit/Reimbursement
Once you’ve had the alterations done, email a photo of the receipt along with the Proper Cloth order number to contact@propercloth.com. We’re happy to reimburse(as store credit) up to $125 for a suit, $75 for a jacket, $50 for dress pants, and $30 for casual pants.