Broadcloth Shirt Fabrics

Broadcloth (sometimes referred to as poplin) is a very popular type of dress shirt fabric. Broadcloth is a very lightweight, smooth, flat-looking fabric, with no pattern in the weave of the threads. It is similar in quality to pinpoint fabric, but has less texture. This usually means it is slightly more transparent and not as shiny as the pinpoint fabric. Broadcloth fabric comes in a variety of thread counts, ranging from 50 singles to over 140 doubles. More information about shirting fabric thread count and ply.

broadcloth dress shirt fabrics

Broadcloth dress shirts are very versatile. A classic white broadcloth fitted dress shirt will appear very dressy and be perfect for formal occasions. Broadcloth makes for an excellent wedding dress shirt, or a business interview dress shirt. Additionally, because broadcloth is such a simple weave type, you’ll find that broadcloths can offer greater complexity and detail in terms of pattern/color design. Depending on the pattern, these can make for an excellent casual dress shirt. Because it is a lightweight dress shirt fabric, it works great for year-round wear.

Broadcloth Fabric Weave

The weave is an extremely simple construction, technically speaking, where the warp and weft yarns cross over and under each other one yarn at a time.

Broadcloth Fabric Weave

Broadcloth custom shirt fabrics.

Dress Shirts: Split Yoke vs One Piece Yoke

What is a dress shirt yoke?

It is the panel of fabric that is just behind your collar that goes over the tops of your shoulders.

What is the difference between a “one piece yoke” and a “split yoke”?

A one piece yoke is made from a single piece of fabric.  A split yoke is split down the middle and sewn together in the middle.

Split Yoke
One Piece Yoke

What are the benefits of a split yoke vs a one piece yoke?

This is where it gets interesting.  First, the three arguments you most often hear are:

1) A split yoke uses more fabric and takes longer to make than a one piece yoke.  While we don’t see this being a true benefit to the owner, many shirt snobs will suggest that because it takes longer and costs more it is therefore superior.

2) In a split yoke, the two pieces of fabric are rotated such that the stripes meet at an angle in the middle and any stripe or pattern is parallel to the front seam of the yoke.  It’s really a matter of taste, but many people claim (and we tend to agree) that this makes for a cleaner, more stylish look.  But this is still a subjective matter and furthermore, if the shirt is a solid color then this argument makes no sense at all.  In fact, one could argue that the extra seam across the back makes the shirt look less clean.

3) Another argument you will often hear is that split yokes provide for a better fit.  We’ve been scratching our heads over this argument for a while.  We suppose it’s possible that an advanced bespoke tailor on Jermyn Street would adjust the different sides of the yoke to accommodate for some unevenness in the shoulders and that this could potentially provide for a better fit, but this is risky stuff.  While an asymmetrical shirt might fit its owner better, it also might actually exaggerate the appearance of the person’s asymmetry.

The real reason split yokes are superior to single piece yokes.

To understand the real reason, you first need to understand how woven cottons stretch.  If you have a dress shirt made from 100% cotton (most dress shirt fabric), you’ll notice that the fabric has threads running both vertically (warp) and horizontally (weft). For most high-quality woven cotton, the fabric will not stretch very much at all if you try to stretch it vertically, or if you try to stretch it horizontally.  However, if you try to stretch the fabric diagonally it stretches pretty easily. Thus, the real benefit of the split yoke is that by rotating the fabrics to the angled orientation, we are basically adding stretch to the yoke across its width! When you’re tying your shoes, or driving a car, or lots of other everyday activities, you put pressure on the yoke and if it is a split yoke it will stretch to accommodate your movement better.

Twill Shirt Fabrics

Twill is a beautiful fabric. It is detailed and elaborate and comes in a variety of patterns and styles. Depending on the color of the threads used and the weave variation, it can produce a diagonal or herringbone texture. Twill fabrics are often more substantial (thicker) and less transparent than a broadcloth of similar quality.  Twill fabrics will also usually be a bit more shiny, and drape in a way that is softer than broadcloth or pinpoint.

Twill Reference

Within the twill fabric family, you can find a variety, including:

Fine Twills

Your standard, subtle dress shirt twill. Woven tightly, the diagonal texture will only be apparent on close inspection. A simple, solid color twill dress shirt is extremely dressy and fit for any formal occasion.

Imperial and Cavalry Twills

These are the thickest twills, and they will have a very bold, noticeable texture to them.

Royal Twills

These have less diagonal texture than the Imperial or Cavalry Twills, but their texture will still be noticeable from a close distance.  We typically reserve this name for very high thread count twills (120s) that are of only the best quality.

Denim

Believe it or not, denim is also a type of twill.  Look closely at your jeans and you will see the fine diagonal texture.

Twill Fabric Weave Pattern

By varying the weave slightly, significantly different patterns can emerge. Here are two similar weaves that produce a diagonal texture:
Twill Fabric Weave
Twill Fabric Weave

A herringbone variation here:
Twill Fabric Weave

Twill custom shirt fabrics.

Pinpoint Oxford Fabric

Pinpoint Oxford, commonly called just “pinpoint” for short is a very popular dress shirt fabric type. It’s both dressy and durable. It has a bit of a matte, crisp finish, though not as silky and flat (thin) as broadcloth, and definitely not as shiny as royal oxford or twill. It works well in both formal and casual occasions. A pinpoint dress shirt feels a bit more substantial than a broadcloth dress shirt, as it’s a tad thicker and therefore less transparent.

pinpoint oxford dress shirt fabric

Difference between pinpoint and oxford fabric

Pinpoint and Oxford fabrics are woven the same way. The difference between the fabrics is not in the weave but in the thickness and weight of the yarns that are used. Pinpoint generally has a higher thread count, and a lighter, finer weave than Oxford cloth. Thus, pinpoint dress shirts are preferable over oxford cloth dress shirts in more formal situations. Pinpoint makes for an elegant but subdued wedding dress shirt, or a perfect business interview dress shirt, while oxford cloth would be better suited for a business casual or outdoor event.

Pinpoint oxford fabric weave

Pinpoint oxford uses an under-over weave, such that the fabric has a bit more texture than comparable broadcloth. Below are examples of the weaving patterns used for both pinpoint oxford and oxford cloth shirt fabrics.

Pinpoint Fabric Weave Pinpoint Fabric Weave

Pinpoint custom shirt fabrics.

How to Iron a Dress Shirt

how to iron a shirtTo keep your dress shirts looking their best, you’ll need to have them pressed.  We usually suggest sending them to the cleaner, but if that’s not possible you’re going to need to know how to iron a dress shirt yourself.  There are many ways to do this effectively, but here we’ll break down our method step by step.

Step 1: Get the right equipment

You’re going to need an iron.  Preferably the iron lets you pour water in (for steam), and better yet it has one of those slippery teflon-coated bottoms. If the iron can’t spray water out the front you will want a spray bottle of some type that can spray a fine mist. You’ll also need an ironing board. If you’re in New York, you have a little ironing board you can set on your dinky little dining room table. If you live in California, you’re wondering what an ironing board is because you wear nothing but t-shirts. If you live anywhere else, you have a nice big fold out ironing board you can setup in your living room. Whatever works!

Step 2: Get set up

Set up your ironing board in a comfortable place where you’ll be able to spread the shirt out without wrinkling it all over again.  If you’re planning to iron several shirts in a row make sure you can see the television from this angle. Plug the iron in and turn the dial to point to “cotton” or whatever the hottest setting is.

Step 3: Iron the back of the shirt

We advocate starting with the back of the shirt because this is going to get wrinkled as soon as you put it on and sit down anyways. Unbutton the shirt completely, and spread it out over the ironing board. Put the dress shirt on the board so that the narrow end of the board goes into the back of the shoulder of the shirt and the edge of the ironing board is along the side of the shirt. With moderate pressure, slide the iron down the shirt from top to bottom, being careful that you keep the shirt flat and don’t actually iron wrinkles into the garment. Use a little steam or spray some water on any wrinkles that aren’t going away easily. Once you’ve done one side of the back, slide the shirt over and do the other side just the same.

Step 4: Iron the sleeves

Iron the sleeves (one at a time). Lay the sleeve long ways on the ironing board and carefully flatten the sleeve with your hands such that it folds along the hem on the bottom of the sleeve. Starting from around the arm pit area, iron toward the cuff and away from the bottom hem. It’s optional to iron in a crease on the top of the sleeve, but if you do this crease should be straight.  If you don’t want a crease, just iron close to the top but not over it. Repeat on the other sleeve.

How to iron a shirt sleeve

Step 5: Iron the top part of the shirt front and yoke

This is the most tricky part to get right but also the most visible since it’s right up by your neck and head.  For this area you’re going to want to use the narrow pointy side of the ironing board.  Pull one shoulder of the shirt over this part of the ironing board such that you have a clear view of one side of the yoke and the front of the shirt just below the yoke. The collar should be sticking up straight and curving around in a circle.  Spray this area down to be damp and iron carefully around the curve of the collar.

Step 6: Iron the collar

Now we do the collar. Take out the removable collar stays from the shirt collar (don’t lose them). Button down collars won’t have collar stays, but you’ll need to unbutton the little buttons that hold the collar down. Unfold the collar so that it is “popped” and lay it flat on the ironing board with the back facing up. Spray the collar down with a good amount of water and give it ~30 seconds to soak in.  Iron from the middle of the collar outwards all the way to the tips of the collar points. Because the collar is a thicker, stiffer piece of material you may need to press slightly harder than you would for the rest of the shirt. When you’re done, put the collar stays back in the collar and fold the collar down again.  If you want you can also fold the collar down and iron in a bit of a crease at the front of the collar so that it will angle down sharply.  You won’t be able to iron this crease all the way around since the collar is designed to curve, but a little bit of a crease at the front can make things look a bit sharper.

How to iron a shirt collar

Step 7: Iron the shirt front

Finally, do the front of the shirt. Hopefully, by now you’ve got the hang of it. Do one side at a time. Be careful of the buttons. Make sure the front placket is not folded over in a way it shouldn’t be. Use the point of the iron to get in the areas up around the front of the collar. If the dress shirt has a pocket, this can be tricky. You can be trickier.  As you push the iron down on one side you can pull gently on the other to keep things tight and straight.

How to iron a shirt front

Note: Always defer to the care instructions on the tag sewn inside your Proper Cloth shirts.

How to Wash a Dress Shirt

Featured

Shirts are made to be worn, not worshiped. This means they get dirty. With proper care, however, a high-quality dress shirt can last for several years and continue to look great. In this post, we’re going to break down three of the most popular washing methods and detail how you can keep your dress shirts looking great for years to come. We’ll also outline how to deal with special emergencies as well as provide some other cleaning tips.

Closeup of clean shirt collar

Method 1: “Wash and press” at the cleaners

Wash and press is the “normal” way to clean dress shirts when you take them to the cleaners, and it’s our first choice. Don’t be too confused by this—even though you take your shirt to the “dry-cleaners,” they are most likely doing wash-and-press unless you are expressly asking them to dry clean.  At just a few bucks per shirt, this cleaning method is relatively affordable, easy, and it keeps the shirts looking great.  Here’s what the process involves at most cleaners:

  1. They wash your shirt in a normal washing machine using water and detergent.
  2. They remove most of the water from the shirt with the spin cycle in the washing machine.
  3. They pull the damp shirt onto an industrial shirt press that closes over the shirt and simultaneously irons the garment while removing all of the moisture.

Pros: Convenient, (relatively) inexpensive.

Cons: Some cleaners will be too hard on the shirts.  The slamming of the press over the front of the shirt can cause  buttons to chip or shatter. If the shirt torso or sleeve is stretched over the press when it is steamed dry it can cause this part of the shirt to become wider in these areas.  Finally, in the process of bringing the shirts from the cleaners to your closet collars will often be smashed in some way, requiring additional ironing for optimal appearance.

Method 2: Wash the shirt yourself at home

If you don’t trust your dry cleaner, or if you’d just like a little more control over how your shirts are washed, you may want to wash your dress shirts at home.  We really like this option, but to do so properly requires a bit of time and care on your part. Follow these steps for optimal results:

  1. Start by preparing the dress shirt. Unbutton all of the buttons, including cuff buttons and any collar buttons.  Remove any collar stays if it has them and put them in a safe place.
  2. Pre-treat any stains by carefully working a little detergent into them, or better yet spot-cleaning them with a stain remover pen.
  3. Set up your washing machine: To minimize wear on a fine or lightweight dress shirt, use the Delicate cycle.  If the shirt is made from a heavier-duty fabric, or is particularly dirty, you may opt for the Normal cycle.  Whites and light colors can use hot water.  Dark-colored shirts that you don’t want to fade should be washed with cold water. Take care not to include other laundry items with bold colors that may bleed into your shirts.
  4. Use a high-quality detergent, that is appropriate to the color of the shirt.  Be sure not to use any detergents or cleaners that are chlorine-based as these will cause discoloration of many shirt fabrics.
  5. Wash the shirts in the washing machine, and then let the spin cycle wring most of the water out of the garment.
  6. The shirts will be tightly crumpled in the washing machine so you’ll want to remove them promptly before these intense wrinkles dry into the shirt. Follow the care instructions on the tag inside your Proper Cloth for the recommended drying method. Note: Be careful about hanging the shirts on a sharp hanger or with tight clothespins as this can distort the fabric or leave a mark on the shirt.
  7. Last, you’ll want to iron the shirts.  You don’t need to wait for the shirts to be completely dry to begin this step, but they should be mostly dry.

Pros: Gives you the most control to treat stains, protect buttons, and iron collars carefully.

Cons: Takes time and attention.

Method 3: “Dry clean” at the cleaners

While we don’t really recommend dry cleaning cotton dress shirts, some folks like to take their shirts to the cleaners and have them dry cleaned. While this cleaning method will certainly not damage the shirt and will minimize shrinkage, it does have some downsides. The first is that it can be expensive—usually over $5/shirt. Another is that water-soluble stains such as perspiration are not removed. Dry cleaning solvents contain very little to no water so perspiration-based dirt can be left untouched.  Washing dress shirts in water is better for removing water-soluble dirt and stains from sweat.  That said, if your dress shirt has an oil-based stain on it you may have better luck getting it cleaned by a dry cleaner than in a washing machine.

Pros: Convenient.  Minimizes wear of the shirts.  Removes oil-based stains.

Cons: Won’t always remove water-soluble dirt or stains. Expensive. Your shirts are at the mercy of a potentially abusive shirt cleaner.

Question: Is it OK to dry shirts in the dryer?

We generally recommend avoiding the dryer and letting the shirt air dry on a hanger, although (depending on your location) this is not always practical.

If you do put the shirt in a dryer, avoid high heat or over-drying the shirt. Use the dryer on a lower setting to get most of the moisture out of the shirt, and then iron the shirt immediately to remove the rest of the moisture and wrinkles at the same time. If you dry your shirts completely in the dryer you’ll find the shirt a bit harder to iron perfectly, and they will likely shrink beyond Proper Cloth’s calculated shrinkage allowances. One notable exception to this rule is non-iron dress shirts which are designed to be dried in the dryer. These should not require ironing if they are promptly removed from the dryer when the cycle is complete and hung up.

Note: Always defer to the care instructions on the tag sewn inside your Proper Cloth shirts.

Question: How to remove a stain from a white shirt?

We all love a great white shirt, but in the unfortunate event that you spill some wine or spaghetti sauce on your shirt, some quick action could minimize any stains that result.

  1. With a brush or comb, carefully swipe or lift away any large pieces such that you don’t smear them worse into the garment. 
  2. Immediately treat the stain with water or stain remover solvent.  The sooner the better.  If you can’t get your hands on a stain remover pen try dishwashing detergent, lemon juice, vinegar, or seltzer water. 
  3. Dab solvents on the stain with a light touch. Pressure can force the stain deeper into the fibers of the garment. 
  4. Rinse and repeat. 

Question: Should I use starch when a shirt is pressed?

While many people do like to have their shirts starched, our suggestion is to avoid starch completely.  While starch can help a broadcloth or oxford shirt appear more crisp, it can also cause shirts to wear out prematurely.  When the starch material gets embedded in the shirt fibers it acts like a million little knives that break down the fibers over time.

Three tips to maximize dress shirt life

  1. Don’t leave dirty shirts in the hamper for too long before washing. This can lead to premature yellowing of the collar band as any sweat and oils will have more time to set into the fabric of the shirt.
  2. Always remove the collar stays from the collar before washing and ironing.  If you don’t they will become warped and cause the dress shirt collar points to curve awkwardly.
  3. Don’t count on your cleaner to find and remove stains. If you know there’s a spot on your placket or sleeve, point it out so that they know to spot clean it.

How to Measure a Shirt: Sleeve Length

How to Measure a Shirt: Sleeve Length

With the shirt front and cuffs buttoned, lay the shirt down and spread it out on its front. Pull the sleeve away from the shirt body. Do not stretch the sleeve, but be sure it is fully extended and laying flat.

Place one end of the measuring tape at the center of the back of the collar, just below the collar band. Run the measuring tape from the center back below the collar to the edge of the yoke seam. Next, hold the tape down at the yoke seam and pivot slightly to align the measuring tape down the length of the sleeve to the end of the cuff.

Do not add extra to account for shrinkage. We will do that for you.*

*Standard Shrinkage Allowance:

Proper Cloth adds 0.3” to the Sleeve Length dimension to account for shrinkage/match industry standards.

Tolerance:
While we do our best to sew each garment precisely to its specification every time, hand sewing and different fabric types naturally result in small variations. We consider a tolerance of +0.5” to -0.5” acceptable for the Sleeve Length dimension.

Selecting Type of Shirt Fit Based on Body Measurements

Selecting Type of Fit: Classic vs. Slim vs. Super Slim Fit

For most men, we suggest starting with our standard or “office appropriate” Slim Fit.  It will be nicely fitted to you, yet still comfortable and not too tight.  However, if you prefer a particularly trim fit, dislike any excess fabric around the chest, waist and arms, and are not bothered by slight tightness or limited range of motion, consider the Super Slim Fit. Conversely, if you appreciate a generous, roomy fit that does not hug your body, then select the Classic Fit.  This will be looser around the chest and arms and boxier through the stomach.

How to Measure Your Body: Wrist Around

How to Measure Your Body: Wrist Around

Measure around your wrist around the wrist bone. Hold the tape measure tight to your skin, but do not squeeze your wrist. Round up to the nearest quarter inch. We will add 2 inches to this measurement when we calculate your cuff circumference.

How to Measure Your Body: Bicep Around

How to Measure Your Body: Bicep Around

With your arm hanging at your side and relaxed, measure around your bicep at its fullest point. This is probably pretty close to your armpit. Make sure the tape measure is not too tight. Round up to the nearest half-inch. Don’t flex. Fine, flex. Done? Ok, now take the measurement.

How to Measure Your Body: Shirt Back Length

How to Measure Your Body: Shirt Back Length

Put the first end of the measuring tape at the base of the back of your neck and measure down your back to the point where you’d want the shirt to end. This point is usually the bottom of the buttocks, although you may want to go slightly longer if you plan to always tuck the shirt in, or slightly shorter if you plan to wear the shirt untucked. Round up to the nearest inch.

Standard Size Dress Shirt Length

If you’re not sure about measuring your body for shirt back length, you can measure the length of a shirt that fits well, or use these general guidelines for shirts that are going to be tucked in:

  • Small=30
  • Medium=31
  • Large=32
  • X-Large=33
  • XX-Large=34

How to Measure Your Body: Waist Around

How to Measure Your Body: Waist Around

Run the tape around the fullest part of the belly. This is usually around the level of the belly button. The measuring tape should be snug on the skin, but not squeezing in. It’s important to stand in a relaxed, normal position–do not push out your belly or suck it in–when taking the waist measurement. Measuring your waist for a dress shirt is different than the waistband of your trousers.

How to Measure Your Body: Chest Around

How to Measure Your Body: Chest Around

Run the measuring tape around the fullest part of your chest, tight up under your armpits and over the shoulder blades.  Let your arms hang down in a relaxed, natural pose.  Do not puff out your chest or arch your back in any sort of pose that isn’t natural or sustainable.

How to Measure Your Body: Shoulder Width

How to Measure Your Body: Shoulder Width

This measurement will require a partner.  If you don’t have a partner, measure a shirt directly.  Either way, it’s helpful to refer to a shirt that fits well in the shoulders. Start the end of the tape on the outside edge of the shoulder where you want the yoke of the shirt to start. This is where the horizontal part of the shoulder meets the vertical part of the arm. Measure up over the curve of the shoulders and to outside edge of the other shoulder.

How to Measure Your Body: Sleeve Length

How to Measure Sleeve Length: Body Measurements

Place one end of the measuring tape at the base of the center of the back of the neck. Run the measuring tape over your shoulder, and let it hang down to your hand. Measure to the center of the meaty part of your palm.

Do not adjust for shrinkage.  We will do that for you.

How to Measure Your Body: Neck Around

How to Measure Your Body: Neck Around

Place the measuring tape around the neck at the height where the collar would normally rest. This will be just below your Adam’s apple. Stand relaxed. Do not crane your neck out or squeeze your chin down. The tape should be resting lightly on the skin, not squeezing it. Hold one finger under the tape measure to ensure some room for comfort. Do not try to account for shrinkage by adding extra here. We will do that for you.

Raising Your Arms Causes the Shirt to Rise too Much

Red Hook

Allow enough room in your fit for you to sit down and stand up without your shirt becoming untucked

Problem description

You like to move around but you feel trapped – raising your arms over your head causes the shirt to move up considerably.  This causes it to come untucked too frequently, making you feel as though you are in a straight-jacket, or just mildly annoys you.

Solution

If you have selected the [Very/Max] Tailored Upper Sleeve fit, then you’ll want to switch that back to Full Upper Sleeve Fit.  If you already have selected the Full Upper Sleeve fit, then there is no easy fix other than to make the shirt’s chest width and sleeve width larger. You may also want to consider adding 1″ to your shirt back length so it doesn’t become untucked as easily.

Shirt Collar Does Not Stand Up When Unbuttoned

Dress Shirt Collar Standing Up

The Problem

You have visions of wearing your shirt open-collar and looking as sharp as Clooney/Pitt/Beckham, but for some reason your collar isn’t on the same page. It’s folding over, flopping to the side, or sliding down rather than standing straight up.

The Solution

A few tweaks to your Shirt Design and Saved Custom Shirt Size can help alleviate this issue. Employing a combination of the options below will definitely improve your collar’s ability to stand up strong when unbuttoned.

  1. Select our Stand Up Front Placket or Stand Up French Front as the front style for your shirts. The Stand Up Front Placket and Stand Up French Front have the same look as their standard counterparts but feature a special stiff, fused interlining in both the front and back (button) side of the placket that allows the collar to stand up incredibly well. We developed these styles specifically to combat floppy collars. 
  2. Apply the Neck Forward posture adjustment to your Saved Size to ensure the back of the collar aligns with the back of your neck for support.
  3. Raise the Top Button Placement to rein in how wide the collar can spread when unbuttoned. The Top Button Placement can be adjusted in your Saved Size.
  4. Double-check that the correct Shoulder Slope, Yoke Width, and Chest Width are applied. A tight upper chest or incorrect Shoulder Slope for your build can adversely affect the collar’s presentation.
  5. Consider going with a button down collar, such as our President Button Down. With the collar points fastened to the shirt just below the collar band, the collar won’t have the same slipping issues as a standard point collar.
Collar Standing Up - Button Down
Collar Standing Up – Button Down

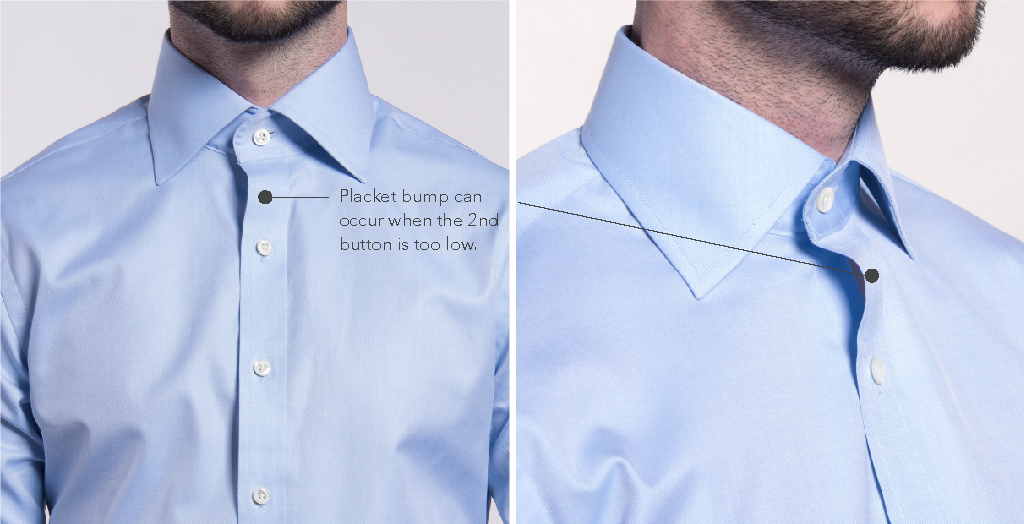
Placket Bumps Out Just Below the Shirt Collar

Problem description

The placket of the shirt just below the collar button seems to pop out slightly.

Dress Shirt Placket Bump

Dress Shirt Placket Bump

Potential Solutions

It’s difficult to say exactly what causes this in all cases, but some adjustments that have worked in the past include:

1 – Wear a tie

For 95% of these cases, this problem solves itself when a necktie is worn. Since the necktie pulls the collar band up tight to the neck, it also pulls the placket tight and reduces any weird gaping or bumping.

2 – Wash and press the shirt

If the problem persists, even when you’re wearing a tie, we usually suggest giving the shirt a wash/press. We often see this issue go away once the shirt isn’t fresh-out-of-the-box new. There are two potential reasons for this: (1) It’s possible that some tension on the threads or fusing of the placket are causing it to want to curve. A good wash or two will often help straighten this out. (2) In some cases, if the collar is a little loose around your neck to begin with, and then it is pulled tight with a tie, the tie can cause the collar band to become out of alignment. A wash or two of the shirt allows the collar to shrink down to its target size and reduces this problem.

3 – Raise the Top Button Placement

Raising the position of the top button (below the collar) will also help eliminate the placket bump. Try raising the button 1/2″ to 1″ to decrease the gap between the top button and the collar band. Tips and more information about Top Button Placement options.

4 – Increase the Shoulder Width

If the Shoulder Width of the shirt is too narrow it can cause the ends of the shoulders to pull the shirt out at the sides and make the placket bump out. A bump in the placket is not a reason in itself to widen the shoulders, but in this case it is worth considering if you have the correct Shoulder Width.

5 – Increase the Chest Width

If the chest is too tight on a shirt, it can cause pulling and tension along the front buttons. Increasing the Chest Width or adding a Chest Forward adjustment can improve how the chest of the shirt drapes, potentially reducing tension below the collarband. Again, a bump in the placket is not a reason in itself to widen the Chest Width or apply a Chest Forward adjustment, but it is worth considering whether the Chest Width fits correctly.

6 – Consider a Shoulder Slope or Neck Posture Adjustment

​​If the Shoulder Slope or Neck Posture setting of the shirt is not optimized for your build, causing the collarband to sit incorrectly, this can create a placket bump.

​​While a placket bump alone is not reason to adjust the Shoulder Slope or Neck Posture, it is worth considering whether one of these changes could improve the fit of the shirt overall.

7 – Change the collar style or fabric

​​If all else fails, perhaps the shape of the collar you’ve chosen is just not agreeing with the shape of your neck and shoulders. The design details of the shirt can also contribute to this issue. A shirt designed with a large fused collar, made from a lightweight fabric, with no front placket to support the more substantial collar, can cause the front of the shirt to buckle. In some cases we’ve seen this issue resolved by changing the collar style or fabric.

Shirt Sleeves are too Long

Problem description

It feels like the sleeves are coming down too far over your hands.  Perhaps when you wear a jacket you are showing too much cuff, etc.

How the sleeve length should fit

With your arms hanging relaxed at your sides and the cuffs of the shirt unbuttoned, the sleeves should come down to the center of the back of the hand (or the first knuckle of your thumb).  This may seem too long to some folks, but the key is to also make sure that the cuffs are sized appropriately to your wrists.  This way, when the cuffs are buttoned they will prevent the cuff from sliding too far over your hand. This extra length will allow you to bend and raise your arms without the cuff sliding up over your forearm.

Shrinkage

Proper Cloth adds a standard adjustment of 0.3” to the Sleeve Length dimension to match industry standards. Depending on the fabric type, additional counter-shrinkage adjustments may be applied. Visit your Order History to compare what the manufactured/pre-wash dimensions were for each shirt.

If the sleeves seem too long consider first that they will shrink with the first few washings. If they seem too short, pre-wash, consider adding 0.5” in addition to the amount you think they are too short.

Adjusting the cuffs tighter

If the cuffs are already stopping the cuff at the correct spot on the hand, but there is too much extra fabric blousing above the cuff, then you do not want to make the cuffs tighter.  However, if the cuff is coming too far down over the person’s hand, tightening the cuff can improve the fit.  The cuff should fit comfortably around your wrist but be tight enough that when buttoned it doesn’t slide too far over your hand. Our general rule of thumb is that the cuff size should be 1.7-2” larger than the measurement of your wrist.  (Note: we measure cuffs from the center of the button to the far edge of the buttonhole).

Showing ¼” to ½” cuff with a sport coat on

Many customers will want to adjust their sleeve length such that the cuff pops out just the right amount from their sport coat.  The best way to do this is to follow the guidelines to get the sleeve length to fit perfectly in and of itself.  Keep in mind that getting the right amount of cuff to show may require the length of the sleeves of the sport coat to be adjusted.