Shirt Sleeves are too Short

How Shirt Sleeves should Fit
Sleeve Length fitting properly. When the cuff is undone the sleeve should fall halfway down your hand.

Problem description

Standing straight up, with your arms at your sides, the sleeves of the shirt are not quite reaching the large wrist bone.

How the sleeve length should fit

With your arms hanging relaxed at your sides and the cuffs of the shirt unbuttoned, the sleeves should come down to the center of the back of the hand (or the first knuckle of your thumb).  This may seem too long to some folks, but the key is to also make sure that the cuffs are sized appropriately to your wrists.  This way, when the cuffs are buttoned they will prevent the cuff from sliding too far over your hand. With the cuffs buttoned, they should just cover the large wrist bone, but not the palm. This extra length will allow you to bend and raise your arms without the cuff sliding far up your forearm.

Shrinkage

Proper Cloth adds a standard adjustment of 0.3” to the Sleeve Length dimension to match industry standards. Depending on the fabric type, additional counter-shrinkage adjustments may be applied. Visit your Order History to compare what the manufactured/pre-wash dimensions were for each shirt.

If the sleeves seem too long consider first that they will shrink with the first few washings. If they seem too short, pre-wash, consider adding 0.5” in addition to the amount you think they are too short.

Shirt Seems Too Short (Desired to be Worn Untucked)

Problem description

You want to wear the shirt untucked, so you are going for a shorter shirt length, but somehow it just feels too short.

How it should fit

Generally speaking we think the shirt tail of an untucked shirt should just come to the center of the butt.   However, if you wear your pants particularly low around your waist this may end up being too short.  The shirt tails curve up two inches at the sides of the shirt, and you don’t want the top of your pants to be below this line.  In this case, you may want to lengthen the shirt so that this is covered.  Also see: how long should a dress shirt be.

Long sleeve vs short sleeve shirts

Interestingly, we find that short sleeve style shirts being worn untucked have a shorter optimal shirt length than long sleeve shirts.  Short sleeve shirts can be made to fit almost like a t-shirt, while long sleeve shirts being worn untucked can seem too short if, when you have your arms at your side, the sleeves come down lower than the shirt tails.

Other factors to consider

You may also want to take a second look at the bottom width of your shirt. If you like to wear your shirt untucked, but it gets stuck around your belt the issue may be a function of bottom width rather than length. Consider adding 1/2″ to the bottom width of an untucked shirt so it doesn’t catch around your waist or hips.

Dress Shirt Comes Untucked

Problem description

The dress shirt comes untucked during the day.  Even with just a little bit of moving around you notice that the shirt is coming out of your pants and looking sloppy.

Lengthen the shirt

If you intend to wear the dress shirt tucked in, then you’ll want to optimize the fit to stay tucked in and look nicely. We suggest increasing the shirt back length such that it reaches the bottom of your butt. Having at least 5″ of shirt below your belt line is key to ensuring that when you raise your arms and move around during the day, the shirt does not come outside of your waistline.

Bottom width adjustment

By default, when creating a shirt size with Proper Cloth, the bottom width of the shirt will be automatically determined by our sizing algorithm behind the scenes. Generally, decreasing the midsection width, making the shirt slimmer in the torso, should create the ideal bottom width automatically. However, if your tucked-in dress shirt size is as slim as you desire but you still find the bottom opening of the shirt too loose around your hips, specifying a decreased bottom width will alleviate this problem while helping your shirt stay tucked in more securely.

Selecting One-, Two-, or Three-Pleat Forearm

One vs Two vs Three Pleat Forearm

One Pleat / Two Pleat / Three Pleat / Three Pleat underside view

What do Forearm Pleats Do?

Forearm pleats are very subtle .5″ folds of fabric at the cuff of the shirt used to determine the rate at which the sleeve tapers from the bicep (sleeve width), through the elbow, and down to the cuff circumference. The number of pleats in the forearm is controlled by your custom shirt size profile.

2-Pleat Forearm: Default for Slim Fit

Selecting the “2-pleat” forearm setting specifies your shirt to have two pleats at the cuff. This is our default setting as having two pleats at the cuff (with all other things being equal) gives a comfortable circumference at the forearm of the sleeve while maintaining a relatively trim profile. It’s an ideal choice if you prefer a slim sleeve overall, without sacrificing range of motion due to tightness in the elbow.

3-Pleat Forearm: Maximum Elbow Room

Selecting the “3-pleat” forearm setting specifies your shirt to have three pleats at the cuff— two on the outer side of the cuff and a third on the inner side. This is the roomiest forearm construction—we designed it for guys with particularly large forearms (e.g rock climbers, tennis players, etc.) and those requiring especially slim cuff circumferences. If you need more room in the forearm/elbow but don’t want to increase the sleeve width, you’ll want to switch to the 3-pleat forearm.

1-Pleat Forearm: Sharp Taper from Bicep to Cuff

Selecting the “1-pleat” forearm setting specifies your shirt to have one pleat at the cuff. There are 2 scenarios in which the 1-pleat forearm may be preferable. The first is that your sleeve width is in line with a ‘Classic’ fit, such that a sharp taper from this wider bicep setting would not impact elbow room. The second scenario would be for particularly slender individuals that find the 2-pleat forearm roomy for their taste, even with their arm bent.

Need an Extra Button at the Bottom of the Shirt

Problem description

When you tuck the shirt in, at the very front the two sides of the shirt tails separate and make for a gap in the shirt right below your belly button. The lack of alignment can make the shirt look sloppy.

Solution

If the last button on the shirt is above the belt, you need an extra button at the bottom of the shirt. Increasing the shirt length to the next threshold point will cause the shirt to be made with an additional button at the bottom of the shirt tail.  With Proper Cloth, the number of buttons on the front of a shirt is a function of the shirt back length, top button placement, and neck posture.  When viewing one of your saved sizes, as you change the shirt back length, top button placement, or neck posture, you will see the calculated number of buttons on the shirt front change in response.

Number of buttons on shirt front

The back length of the shirt will directly affect the number of buttons on the front. With standard Top Button Placement and a Standard Posture setting, the Back Length measurement will yield the following number of buttons on the front:

-Back length = 26 to 26.3″ has 6 buttons

-Back length = 26.4 to 29.9″ has 7 buttons

-Back length = 30.0 to 33.6″ has 8 buttons

-Back length = 33.7 to 37.1″ has 9 buttons

-Back length = 37.2 to 38.0″ has 10 buttons

Choosing the Optimal Neck Posture Setting

How it should fit

The collar should fit comfortably on your neck when you stand up straight with your arms at rest. There should not be a bump behind the collar or a gap between the back of the neck and back of the collar.

How the neck posture adjustment works

Changing this setting moves the collar forward or backward on the shirt relative to the shoulders.

Determining the optimal neck posture setting

To check this you will need a friend (or several mirrors). Often if you try to self-diagnose this one, the very act of turning your head to look in the mirror will create or hide the very problem you’re looking for. With the collar buttoned all the way up, stand up straight with your arms at your side. Look straight ahead and be sure to keep your shoulders relaxed and comfortable (don’t push your shoulders back or hunch them forward at all).

In this position, if the back of the collar is pushed tight against the back of your neck and the fabric of the yoke of the shirt is pushing up on the back of the collar you will want to consider either the “Neck Back 1/2” or “Neck Back 1” adjustments based on the severity of the bump.

Alternatively, if the back of the collar does not even want to touch the back of your neck, you will want to try the “Neck Forward 1/2” or “Neck Forward 1” adjustments.

Left: Neck Forward scenario — Right: Neck Back scenario

Note: If you’re adding a posture setting to an existing shirt size, we suggest you adjust the shirt length as well to maintain a front and back shirt length that is consistent with those of the shirts you already wear.

How to Select the Optimal Dress Shirt Shoulder Slope

How it should fit

A perfect fitting dress shirt should drape smoothly across the upper chest, without any pull lines from the center button out to the shoulders or from the armpits towards the back of the neck.

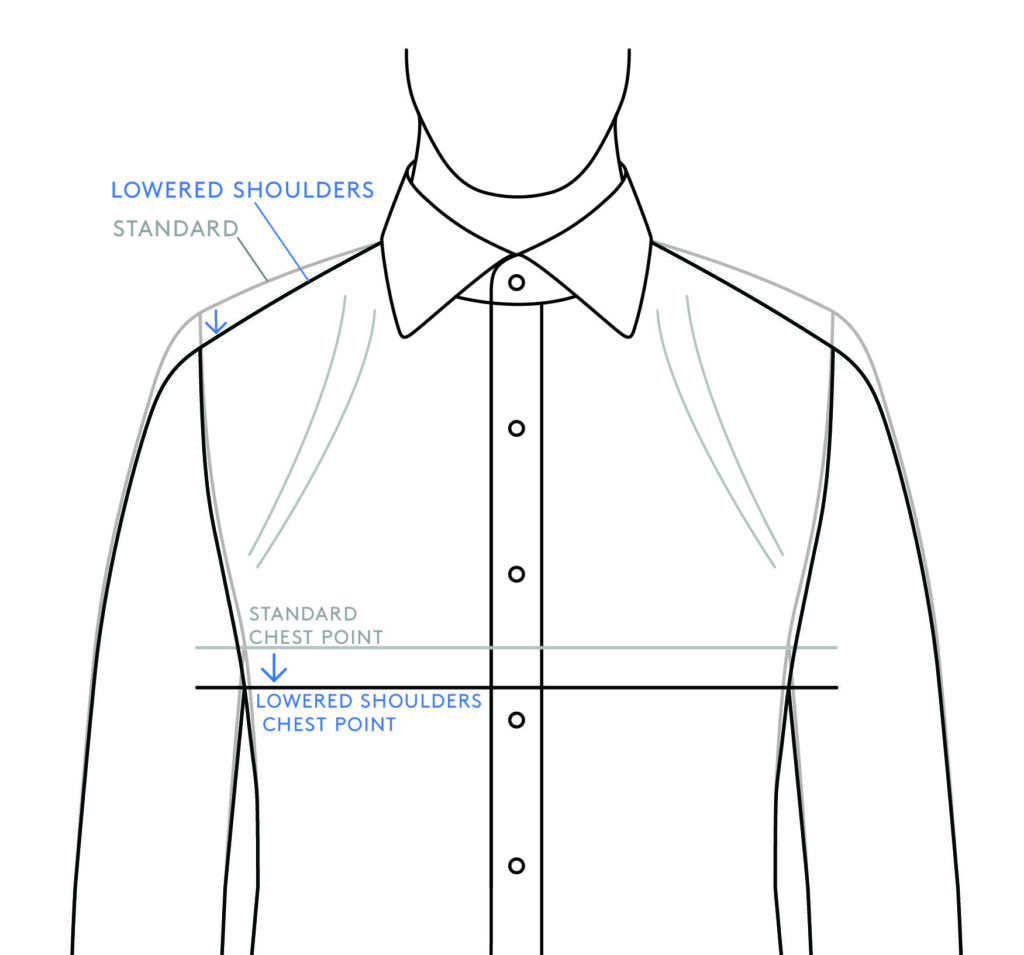
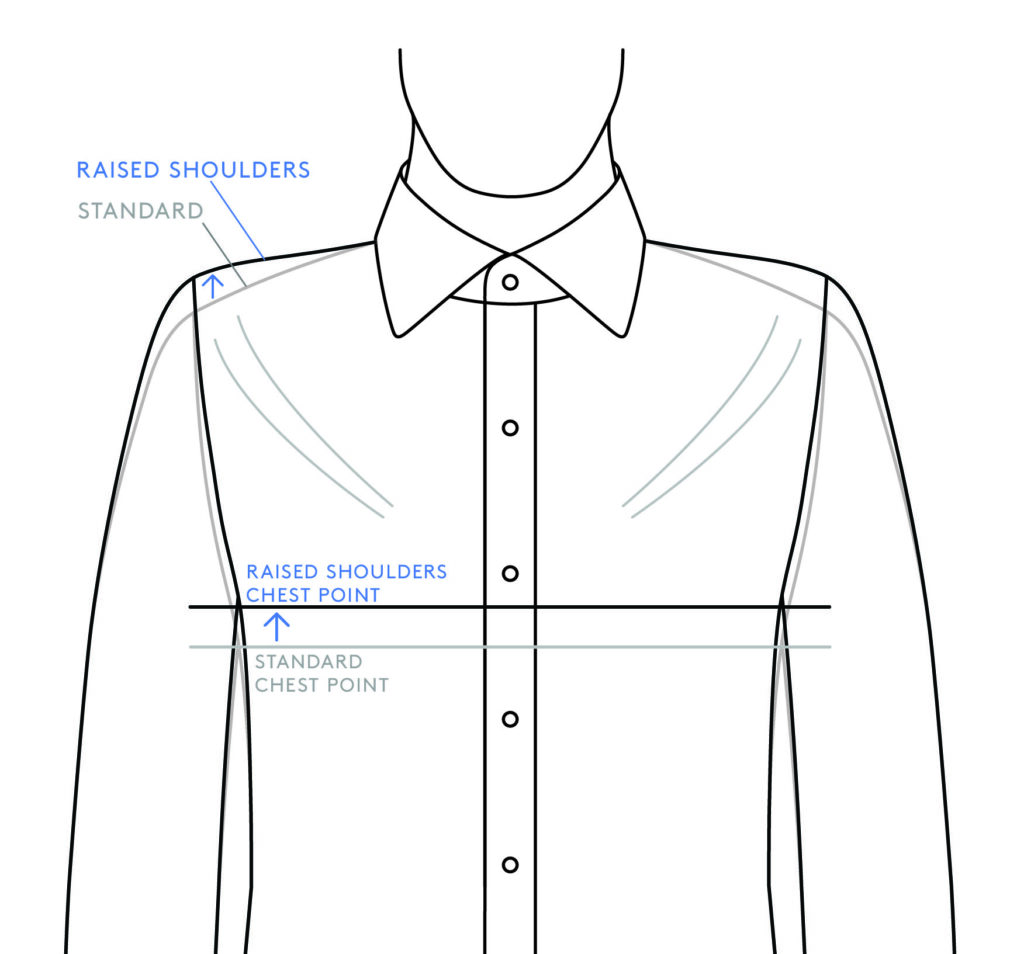
To achieve this, the shirt’s Shoulder Slope should match the natural angle of your shoulders. Whether you have broad, squared, rounded, or sloped shoulders, Proper Cloth offers six Shoulder Slope adjustments to meet most variations of shoulder shape and sizes:

  • Raised Shoulders +0.4”
  • Raised Shoulders +0.2”
  • Standard
  • Lowered Shoulders -0.2″
  • Lowered Shoulders -0.6”
  • Lowered Shoulders -1.0”

How to select the optimal dress shirt shoulder slope

To see if an adjustment is required, put on the shirt and stand in front of a mirror with your arms at your sides.

It’s important that you test this as you plan to wear the shirt.  That means, evaluate with the collar buttoned IF you plan to wear the shirt with the collar buttoned and evaluate with the collar unbuttoned IF you plan to wear the shirt open collar.  Whether the collar is buttoned or unbuttoned may change your optimal shoulder slope setting.

There are several increments of Raised and Lowered Shoulder adjustments. The numeric value of the increment refers to the specific amount that the armhole is raised or lowered to better align the shoulder of the shirt with the shoulder position of the body. We recommend changing by one increment at a time before choosing the maximum increment.

Signs that you need the Lowered Shoulders adjustment

If you notice lines running from the armpits up towards the back of your collar, it’s a sure sign that you should increase the shoulder slope of the shirt.  This means that, if you have the shoulder slope set at “Standard”, you will want to change it to one of the “Lowered Shoulders” settings.  Selecting between Lowered Shoulders -0.2″, Lowered Shoulders -0.6″, and Lowered Shoulders -1.0” is more art than science, but generally speaking the more extreme the symptom (i.e. the lines on the shirt) the more slope you want to implement.  Lowered Shoulders -0.2” will lower the armhole and shoulders of the shirt by 0.2″ from “Standard.” Lowered Shoulders -0.6” will lower the armhole and shoulders of the shirt by 0.6” from “Standard.”  Lowered Shoulders -1.0” will lower the armhole and shoulders of the shirt by 1.0” from “Standard.”

An example of lines from the armpits up towards the back of your collar. And how a corrected lowered shoulders and lowered shoulder chest point looks like.

Signs that you need the Raised Shoulders adjustment

If you notice lines running from the outside of your shoulders down towards the second button of your shirt, you should decease the slope of the shoulders.  If you have the shoulder slope at “Standard”, you will want to change it to one of the “Raised Shoulders” settings.  Selecting between Raised Shoulders +0.2” and Raised Shoulders +0.4” can be a tricky choice, but generally speaking the more extreme the symptom (i.e. the lines on the shirt) the more drastic a change is necessary. The Raised Shoulders +0.2” setting raises the armhole and shoulders by 0.2″ from “Standard.”  Raised Shoulders +0.4” raises the armhole and shoulders by 0.4″ from “Standard.”

An example of running from the outside of your shoulders down towards the second button. And how a corrected raised shoulders and raised shoulder chest point looks like.

Caution: In case your shirt’s Shoulder Width also needs adjustment

One scenario that can confuse this test is when the Shoulder Width of the shirt is significantly wider or narrower than the shoulders.  If the yoke of the shirt goes way over the edge of your shoulders, or does not reach the end of your shoulders, it can cause pull lines to appear that are similar to the ones shown above.  Be sure the shoulder width of the shirt is close to perfect before trying to optimize the shoulder slope.

Selecting a Watch Allowance

If you’re adjusting the cuffs of your dress shirt to be fairly tight to your wrists and consistently wear a watch on your left or right wrist, you may want to consider specifying a watch allowance.

Dress Shirt Watch Allowance

How dress shirt watch allowance works

Selecting a watch allowance allows you to make the left or right cuff .25″, .5″ or .75″ larger than the other cuff so that it can slide over your watch comfortably. You’ll want to specify the watch allowance for the wrist that will have the watch (obviously).

Choosing the right amount of watch allowance

Selecting between .25″, .5″ and .75″ will depend on the size of your watch, and how tight you’re making the cuffs in general. If you’re keeping the cuffs fairly loose you may not need a watch allowance at all. However, if you notice that the cuff of your watch hand is annoyingly not sliding over your watch, you will want to make this cuff larger. We generally find that .25″ is enough extra space for slim, dressy watches, but if you have a dive watch or otherwise particularly large watch you might need the .5″ to .75″ difference.

Selecting a two-button cuff for versatility

One trick we’ve found that works well for guys that have extra large watches they sometimes wear, is to choose a two-button cuff style cuff instead of our one-button options. With a two-button cuff, you are able to button the back button on the cuff only, such that the cuff can more easily open around a larger watch.

How Tight Should Dress Shirt Cuffs Fit

Dress shirt cuffs fitting with and without a watch on the wrist.

How tight should dress shirt cuffs fit?

The cuff should fit comfortably around your wrist but be tight enough that when buttoned it doesn’t slide over your hand.  A proper fitting cuff is just as important as proper sleeve length to insure that the sleeve comes to the right point on the hand.  Our general rule of thumb is that the cuff size should be ~1.75” larger than the measurement of your wrist tight to the skin.

Cuff size on barrel vs French cuff style cuffs

The way we size our shirt cuffs, you should be able to switch between French (fold back) and barrel style cuffs without needing to adjust the cuff size.  Generally speaking, the way we design our button and buttonhole placements on cuffs the same size should work equally well with both styles.  However, keep in mind that the style of cufflinks used to close the French cuffs can make a big difference in how tight the cuffs feel.  Some cufflinks will squeeze the cuffs closed very tight whereas others will keep them very loose.

Accommodating a watch

If you have a watch that needs accommodating, you can increase that cuff size separately using the watch allowance option.

Caution: French cuffs and slim fitting blazers

If you’re having French cuffs, one extra thing to check is to make sure the cuff fits through the sleeve opening of your blazer smoothly.  Modern, slimmer blazers can have narrow sleeve openings that will hook on a French cuff if it is too large.  In these cases, decreasing your cuff size by .25” or .5” might be useful to ensure a good fit.

How the Sleeve Width Should Fit

The fit of the sleeve width around the bicep.

How it should fit

This is a matter of taste and a bit subjective.  Generally speaking, the sleeves should be slim enough to look clean, but not so tight as to cause discomfort under the armpit or at the elbow.  Clients used to a more “generous” shirt cut generally prefer a wider Sleeve Width.  Clients looking for a more modern, slim-fit shirt will prefer the sleeves as trim as possible without causing any discomfort.

How the adjustment works

Widening the Sleeve Width by 0.3” increases the total circumference of the sleeve at the bicep (1” below the armpit) by 0.6″.

Adjusting the Sleeve Width also increases the overall circumference of the armhole (lowering the bottom of the armpit).  A smaller Sleeve Width will have a correspondingly smaller armhole.

Caution: Slim sleeves can be too tight at the elbow

Decreasing the Sleeve Width will also make the sleeve slightly tighter around the elbow as well, so be careful not to make it too tight.  Bend your arm fully with your current fit to make sure you’re not in danger of being uncomfortable at the elbow.

If you want to make the sleeves slimmer around the bicep but they are already dangerously slim around the elbow and forearm, you can usually decrease the sleeve width by .2” and increase the number of pleats in the forearm without creating problems.

Overall sleeve shape and taper

There are a number of ways to adjust the size and shape of a dress shirt sleeve to best fit one’s preferences. All of the dimensions below work together in any combination of ways to create your ideal sleeve fit.

Sleeve Width: This dimension controls the width of the bicep, measured 1″ below the armhole seam.

Cuff Around: Specifies the overall circumference of the shirt’s cuff.

Sleeve Length: The overall length of the sleeve measured from the center back, to the shoulder seam, down to the cuff’s end.

Forearm Pleats: Pleats applied to the shirt where the forearm end of the sleeve meets the cuff. Increasing the number of forearm pleats provides more room in the lower half of the sleeve. Decreasing the forearm pleats will reduce the width of the lower half of the sleeve.

Upper Sleeve Fit: The Full, Tailored, Very Tailored and Max Tailored Upper Sleeve Fit options adjust the angle at which the sleeves are attached to the body of the shirt. Read more about these options here.

How Long Should the Shirt’s Back Length be?

Selecting the optimal back length

Selecting the optimal (shirt) back length depends primarily on if you plan to wear the shirt tucked-in or untucked.  Other factors such as how high you wear your pants, the size of your belly, and the desired number of buttons on the front should also be considered.

How long should should a tucked-in shirt be?

A tucked-in shirt should come to the bottom of the butt or slightly below. Generally speaking, the longer a shirt, the more securely it will tuck into the pants, and the straighter it will stay aligned at the front.

A tucked-in shirt length hitting at the bottom of the butt—a good length.

How long should an untucked shirt be?

If you plan to wear your shirt primarily untucked, you will likely want a slightly shorter back length.  But take care not to go too short!  This is a very common mistake.

A good rule of thumb is that an untucked shirt should come to the middle of the butt.  Another good rule of thumb is that the front bottom shirt tail should end midway down the fly of your pants. However, everyone is shaped differently so these rules don’t always work out.  When in doubt, measure the back length of a shirt that has an untucked length you like.

Untucked shirt length hitting at about the center of the butt.

How the back length measurement works

The shirt’s back length is measured from the center back of the bottom of the collar down to the bottom of the back shirt tail. Adjusting this measurement will raise or lower the entire bottom of the shirt.

Note: The sides of our standard, rounded shirt hem curve up 2” from the center bottom of the shirt, so decreasing the length of the shirt will also raise the sides of the shirt the same amount. More information on shirt hem designs here.

Converting from dress shirt to casual shirt

Many guys opt to make the shirts they wear untucked a bit shorter than shirts they always tuck in.  In our experience, an untucked shirt’s shirt length should be around 1.5 – 2.5” shorter than an always-tucked shirt.

If you have a large belly

Men with larger stomachs will want to opt for increased (shirt) back length since the shirt needs to go over the belly and still tuck into the front of the pants.

Number of buttons on shirt front

The number of buttons on the front of the shirt (including the collar button) is a function of the Top Button Placement, the Back Length, and your Posture setting.

The back length of the shirt will directly affect the number of buttons on the front. With standard Top Button Placement and a Standard Posture setting, the Back Length measurement will yield the following number of buttons on the front:

-Back length = 26 to 26.3″ has 6 buttons

-Back length = 26.4 to 29.9″ has 7 buttons

-Back length = 30.0 to 33.6″ has 8 buttons

-Back length = 33.7 to 37.1″ has 9 buttons

-Back length = 37.2 to 38.0″ has 10 buttons

The buttons on the front placket of a dress shirt.

How the Shirt Bottom Width Should Fit

How it should fit

The shirt bottom on an untucked shirt.

The optimal bottom width will depend on how the midsection width fits and if you plan to wear the shirt untucked or tucked in. For untucked shirts, it should be loose enough to not be tight on the hips of your pants, but not so loose that it flares out at the bottom too drastically.

For tucked-in shirts, it should be tight enough that it is not causing an unwanted puff of excess fabric just above the belt, but loose enough that it doesn’t squeeze at your hips.  Having a bottom width that is too tight at the hips can cause the shirt to ride up the hips as you move around and not stay tucked in neatly.

How the measurement works

The bottom width is the width of the shirt at the bottom of the side seams.  Similar to chest and midsection width, adjusting the bottom width by 1” will adjust the total circumference by 2”.

How the shirt bottom measurement works.

General tips

Bottom width is best left to “default” for most guys.  However, if you’re going for a particularly slim fit through the chest and midsection it may be necessary to override the default bottom width and specify something that is a better match for your specific shape.  Take particular caution if you have a large difference between your chest, waist, and hip measurements.

How the Midsection Should Fit

The "office appropriate" slim fit and the super slim fit.

Left: Office Appropriate Slim — Right: Super Slim

How it should fit

The fit of the midsection is a matter of personal preference.  If you prefer a more relaxed fit, you can make the midsection as loose as you like. If you desire a tailored, slim-fit look, you’ll want the midsection of the shirt to sit fairly close to your body, but not be so tight that it causes pulling at your stomach.

How the measurement works

The midsection of the shirt is measured across the center of the middle of the shirt body.  This is at the point directly between the bottom of the armpits and the bottom of the shirt side seams. Increasing the shirt back length, which elongates the shirt body, will proportionately lower the middle point of the shirt across which the midsection width is measured.

Modifying the midsection width by 1” adjusts the shirt circumference around your body by 2”.

How the Chest Should Fit

How the chest of a dress shirt should fit on an "office appropriate" slim and super slim shirt.

Left: Office Appropriate Slim Fit — Right: Super Slim

The perfect fit of a dress shirt at the chest is a matter of personal preference.  If you prefer a more relaxed fit, you can make the chest as large as you like.  If you desire a tailored, slim look, you’ll want to reduce the Chest Width as much as possible without going so tight that it impacts comfort or produces unattractive pull lines across the chest.

How the measurement works

The Chest Width of the shirt is measured from the bottom of one armpit to another. Modifying the Chest Width by 1” adjusts the shirt circumference around your body by 2”.

How the Shoulder/Yoke Width Should Fit

How the shoulders/yoke should fit—incorrect and correct fits.

Left: Incorrect Fit — Right: Correct Fit

How it should fit

This shoulder width or yoke should be sized so that it ends right where your shoulders end and your arms begin.

How the measurement works

The yoke of the shirt is the piece of fabric that runs across the tops of your shoulders. Decreasing the yoke by 0.6” effectively reduces it by 0.3” on each side.

Yoke width looks right but still feels tight

If the yoke seems to end at the right spot on your shoulders, but you still feel some tightness in the shoulders or across your upper back, consider increasing the chest width or adding rear pleats to increase your range of motion.

If you prefer the look of the yoke extending past the end of the shoulders

In some cases, we’ve found that some clients who are used to a more generous or “classic” fit dress shirt desire the yoke width to extend past the end of the shoulders.  While we understand this request and are happy to work with everyone to get exactly what they want, we do not recommend it as it can cause other fit problems to arise.

How the Sleeve Length Should Fit

Shirt sleeves and cuffs fitting properly
Cuffs fitting properly. When the cuff is undone, the sleeve should fall halfway down your hand

How the sleeve length should fit

With your arms hanging relaxed at your sides and the cuffs of the shirt unbuttoned, the sleeves should come down to the center of the back of your hand (or the first knuckle of your thumb). This may seem too long for some folks, however, we find this works very well when the cuffs are also sized appropriately to the wrists. This way, when the cuffs are buttoned they will prevent the cuff from sliding too far over your hand. This extra length will allow you to bend and raise your arms without the cuff sliding up over your forearm.

How the measurement works

The sleeve length is measured from the center back of the neck, just below the collar, over the shoulder and down to the end of the cuff. This is an industry standard way of measuring the sleeve length. Some other shirt makers will specify the sleeve length just from the end of the shoulder to the end of the cuff, so be sure you are not confused by this.

With our method of specifying the sleeve length, it is independent of the shoulder (yoke) width, so you don’t have to worry about how adjusting the shoulder width will effect the sleeve length.

Different Sleeve Lengths: What if one of my arms is longer/shorter than the other?

If your arms are not the same length or your shoulders are quite uneven, you can set two different lengths for your left and right sleeves.

Specifying different Right and Left sleeve lengths.

Simply click the ‘Uniform’ button in your Saved Custom Shirt Size. This will display the expanded options and allow you to adjust right and left shirts sleeve lengths separately. 

Shrinkage

Proper Cloth adds a standard adjustment of 0.3” to the Sleeve Length dimension to match industry standards. Depending on the fabric type, additional counter-shrinkage adjustments may be applied. Visit your Order History to compare what the manufactured/pre-wash dimensions were for each shirt.

If the sleeves seem too long consider first that they will shrink with the first few washings. If they seem too short, pre-wash, consider adding 0.5” in addition to the amount you think they are too short.

How Snug Should a Shirt Collar Fit

How the dress shirt collar should fit

The dress shirt collar should fit comfortably without being too loose.  As tight or snug as possible without being uncomfortable.  You should be able to fit 1-2 fingers between the collar and your neck when it is buttoned.  You should not have a large gap showing between the collar and neck.  Heavier men should make sure their necks are not puffing out over the top of the collar.

How a dress shirt collar should fit

 Shrinkage

Proper Cloth adds a standard adjustment of 0.4” to the Collar Around dimension to match industry standards. Depending on the fabric type, additional counter-shrinkage adjustments may be applied. Visit your Order History to compare what the manufactured/pre-wash dimensions were for each shirt.

If you never wear a tie

If you never or rarely wear a tie, having the collar a bit tight when buttoned is totally ok and in some cases will make the open collar stand up more nicely.

If there’s a gap behind your neck

If the collar feels uncomfortably tight when it is buttoned, but you can still see a large gap between the back of your neck and the back of the collar band, then you will want to consider using a neck forward posture adjustment.

Tightness Across the Shirt’s Back When Reaching Forward

Problem description

While your shirt may look great when you’re standing straight with your arms at rest, you feel unable to move around like you want. Primarily, reaching forward causes the shirt to feel tight across the back.

Potential Solutions

  1. Adding Rear Side Pleats. Adding rear pleats gives you 2″ more range of motion while reaching forward, without making your shirt look any baggier in the front.
  2. Switching to Full Upper Sleeve Fit. Changing the Upper Sleeve Fit from Tailored (or Very/Max Tailored) to Full Upper Sleeve Fit will remove some of the tightness around your shoulders and provide increased range of motion.
  3. Increasing the Chest Width. This too will give you more room to reach forward and backwards, but will also make the chest of your shirt appear looser.
  4. Increasing the Sleeve Width. The upper arm will get more room to move, which can help with this issue. Like adding to the chest width measurement, this will make the shirt visibly looser.

Shirt Collar Feels Tight But There is Space Behind the Neck

Neck Forward

The Problem

When the shirt is fully buttoned up, the front of the collar is pushing hard against the front of the neck uncomfortably, but at the same time there is a gap between the back of the neck and the back of the collar.  This is caused by the person having a posture where the neck goes slightly forward and the shoulders go slightly back.

The Solution

The typical response to a tightness at the front of the collar is to make the collar larger, but if you have a particularly forward neck posture that is not the optimal solution.  It’s for this situation that we invented the Neck Forward adjustment.  If the problem is significant enough for you to notice it, we suggest using the Neck Forward 1” adjustment.

How the adjustment works

This adjustment moves the collar position forward relative to the chest and shoulders of the shirt.  If your neck is slightly forward, this adjustment can help better align the collar with your neck.

Shirt bumps up behind the back of the collar

Problem description

When the shirt is fully buttoned up, the fabric just below the back of the collar bumps up and comes up over the collar slightly.

Potential solutions

This is a tricky problem that can be caused by a few different factors. We offer a few potential solutions:

  1. Raising the Shoulder Slope
  2. Switching to Neck Back 1/2” or 1″
  3. Increasing the Shoulder (Yoke) Width

Raising the Shoulder Slope

Adjusting the Shoulder Slope to be more raised (eg. from Standard to Raised 0.2″, from Lowered -0.2″ to Standard, etc.) can potentially reduce a bump of fabric behind the back of the collar. If you also exhibit other signs of raised shoulders, such as the pulling lines from the center chest out toward the edge of the shoulders, then this adjustment should be considered first.

Square Shoulders

Raised Shoulders

Adjusting Neck Posture to ‘Neck Back’

It’s also worth considering adjusting the Neck Posture to remove the bump of fabric behind the back of the collar. Applying the Neck Back posture adjustment will shift the position of the collar backwards relative to the chest and shoulders of the shirt. The severity of the bump will determine whether the Neck Back 1/2″ or Neck Back 1″ setting should be applied. Depending on one’s build, a combination of a more ‘Raised’ Shoulder Slope and a Neck Back posture adjustment may be the solution.

Neck Back

Widening the Shoulder (Yoke) Width

If the Shoulder Slope and Neck Posture appear to agree with the wearer’s build, consider widening the Yoke Width. If the Yoke Width is too narrow, the tension from one’s body pushing against the ends of the shoulder seams can cause the yoke to buckle across the top of the shoulders. This pulling across the shoulders can be the sole cause or a contributing factor to the bump of fabric behind the collar.